The Quintessential RC Plane

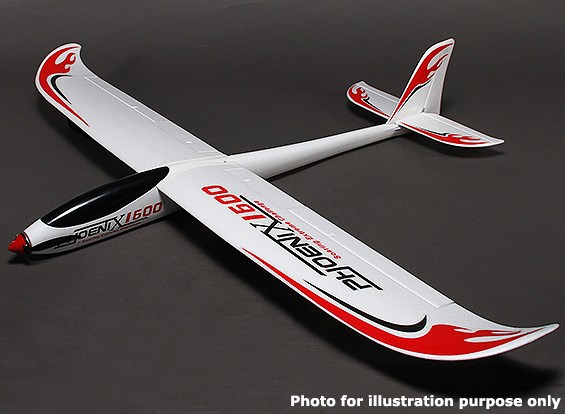
The Phoenix 1600 is an anomaly. It's dirt cheap, built extremely well, and suffers from poor marketing and a couple of minor engineering missteps. So, let's unpack what it really is. It's a great plane for someone with intermediate building and flying skills. This is not a trainer and not a good choice for a newbie. There are so many planes on the market today that would be a better fit for a new pilot. And yet, half the manual is devoted to teaching how to fly the plane.
The other issue is that there are a couple of design flaws that aren't fatal but are workarounds. They have to do with the placement of the servos for rudder and elevator. What I found works best was to take a file and file down part of the plastic on the fuselage to allow for the servos to turn freely in the proper position.
The largest single issue this plane has is the lack of good instructions. In order to build this plane, you will need to hunt around on Youtube to find build videos. I did write a post about mounting a motor to this plane and offered a couple of motors that will work with this plane.
What sets this plane apart is that you can fly it six channels. One of the alternate builds is to make it a glider and skip the motor all together. It's far from a top-shelf gilder, but plenty of people use it for slope soaring. The other thing that sets it apart is build quality. It's actually a very good build quality. Again, it's not the best but its far superior to most of the planes I've seen in this price range. The fuselage is a similar plastic that baby toys are made out of, so it's durable and not cheap to make.
If this plane cost three times as much I would say that it's not worth the price. But, at this price, it's a FANTASTIC buy.
1. Documentation: 1 points out of 5 points possible.
The documentation is for the PNP and not the kit version. There's a little bit there that is useful. We live in an internet world these days and fairly good information to build this plane can be found online. Thus, the poor documentation isn't a deal breaker.
2. Quality of Materials 20 points out of 20

It's a perfect score not because it's the best materials I've ever seen in a kit, but because it's the best materials I've seen in a kit of this price range. The foam is robust and the fuselage is spectacular. The control horns get screwed in on both sides and they include things like the extensions for the servos.
3. Build process 17 out of 20 points.
Other than the servos in the wings there isn't a lot of need for gluing. If I were to build one for a friend I could have it together in an evening if I had the electronics ready to go before the plane arrived. Realistically, it would be a fantastic rainy-day build because it would take most of a day to build from scratch. I tend to like to build a few hours here and there so this plane would be something I would take about a week to build. There are quirks to building this plane so it's best not to rush through it.
The two things that weren't obvious was the motor mount which I outlined in an article. The other thing was the servo placement. It was odd, to say the least. You'll find a pair of cut outs on the fuselage for the servos. But they don't go there. They go further back into a spot that doesn't look like it was designed for servos. This spot works well, except. . . One of the servo arms will hit the side of the plane. And, the standard servo sits up too high. What it looks like building this plane is that it takes a 17g and 9g servo. The interesting thing about the design of the plane is that you can assign a control rod to either the rudder or the elevators on the tail. So, I thought about it logically. If you have total control of ailerons the rudder is kinda an afterthought anyway. Thus, the 9g servo got demoted to a rudder. The larger 17g servo was for the elevators. What I discovered was that if I trimmed off the end of the control arm it would just clear the side of the plane. And then, with a little creative filing of the top of the edge of the plane (there is a lip) I could allow the rudder to turn freely. At first I was fine without full control of the rudder, but in the end, I got full control of the rudder.
And that's really the extent of it, a lack of good instructions (which sadly is common) and a somewhat minor workaround with the servos inside the plane. I did follow my own advice (which I am not always prone to do) and ran the ESC under the battery tray. This left the battery tray free to mount batteries without wire getting in the way.
4. Flight Characteristics 30 out of 30
I can abbreviate my maiden flight in 3 letters. M, M, M. Maiden Motor Meltdown. This has nothing to do with the plane and has more to do with my speed controller or most likely culprit, the motor. About a year ago I bought this motor for the Phoenix 2000 and decided to go another direction. In that time the motor has been discontinued at HobbyKing (hmmm). I got somewhere between one half and 3/4s of a flight with the motor before it overheated and stopped working. But, it was enough for me to form my own decisions and yes, I will update this review with more experience.
The basic design of this plane is something I've noticed about Volantex planes in general, they are heavy. There isn't a lot of nuance with this plane, you build it, throw a 3S 2200mAh battery and take off. But, because it's heavy I noticed at 1000KV with a 9x6 propeller was a bit anemic. I want a bit more power to get up to the sky. Even if the motor is still working I want it out of this plane in favor of something with a bit more thrust. I have a C-311 Leopard 2835/6T 1350KV on order. The speed controller will be swapped out as well.
The flight platform for this plane is good. It's not a floater but may glide well with a bit more fine-tuning. It is easy to fly and is very responsive. Right out of the gate this was a plane that required hardly any trim. I put a small amount of up trim in during the flight and the plane did very well. It feels like it may be able to handle a bit of wind and still maintain control. I don't have any planes that can reliably fly in my late afternoon Southern California wind. Thus, this plane, though not one of my beloved floaters is still something that I can appreciate.
I was able to make the plane roll, loop and invert on the maiden flight. There is a fair deal of excitement about this plane. Of course, the million dollar question is about installing flaps. And, that's where I start to object. Flaps aren't a bad idea, if you really need them. If you're flying in windy and turbulent areas then yes, by all means, you'll want something to slow down your plane. But, if you are flying in the mild wind then it's just adding extra weight for something you don't really need.
I am glad to say that I really took my time to build this plane and the plane was perfect from the start. I wished that the motor didn't quit because I need a few more flights to really get a good feel for the plane. But, from the expereince I had, I really, really liked it.
The plane as a glider would be interesting. It would make a good slope soaring plane. But, that's a different type of flying and the gliders tend to get thrashed on the slopes. Thus, this being robust and cheap is a good thing. With a glider, I can see wanting to have flaps from day one. Gliding is its own sport and I think this would make a great first glider if I were to go that route.
5. Value 15 out of 15 points
For what you get for very little money this plane is an exceptional value. You can work around the issues it has in the build process and add an excellent plane to your collection.
6. Ability to modify 8 out of 10 points.
You can put a variety of motors on the plane. One guy wanted to put on a camera rig onto his Phoenix so he went with a lighter motor due to the extra weight on the nose. Of course the ability to add flaps makes this plane more customizable. My big mod was to paint the foam and laminate it. I went for a bright pink so that I could see it way up in the sky. I really do like the paint scheme.
Though it's not tops on the ability to be modified it is still one of the more versitile planes on the market.
Final Score 91 out of 100
With a score of 91 this is a good all around plane to kick around when you're ready for a 5 or 6 channel plane. The 1600 is the same fuselage as the 2000 but has 400mm (15.5 inches) less wing length. Having watched good videos from Allen Moore and Andrew Newton I am moving on to build another Phoenix 2000 as a glider. It's not an immediate need as I've got my hands full of other build projects and HobbyKing is out of stock on the 2000.
I have opted for the Leopard 2835/6T 1350KV motor to power both of my Phoenixes. I will update this review as I get more experience with these planes. But, overall I am beyond impressed at the value. HobbyKing does stock replacement parts, but mostly in Hong Kong which is far too expensive to ship to the United States. It may be cheaper to buy another kit and salvage parts as you need them.
The one good sign about the Phoenix is that Andrew Newton seems to have planes given to him left and right He can't keep most of them. So, what sticks around is what I pay attention to. Andrew has the Phoenix in a regular plane and a slope soarer. Allen Moore flew his Phoenix so much that he wore it out and built another one. He has a slope soarer as well. This is a guy who has a Bird of Time glider (huge an beautiful) but likes his Phoenix. These aren't endorsement deals, these are guys who fly what they like.
To me, the Phoenix glider would mean that I could get started in gliding with a plane that I can bash, crash, repair over and over again. Slope soarers tend to take a lot of abuse.
.jpg)


