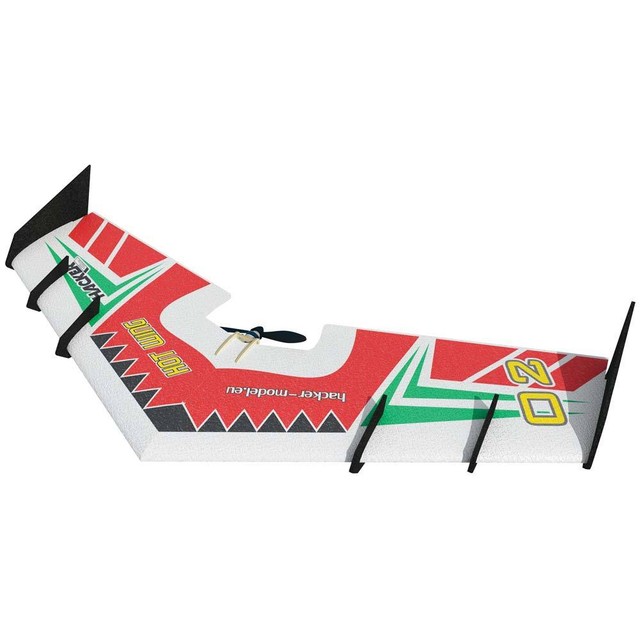
Wednesday, September 13, 2017

The Evo 1000 Source List

Evo 1000 when built


Since I have a few friends interested in getting into the RC Flying Hobby, I am including a first ever source guide.  This is what I've used.  It's good and it's dirt cheap.  I'm only listing two vendors to keep things simple.  I also wrote a more in depth article about the Evo 1000 suggesting that it's best to buy two.      Since the days of the Hobby Store in your town are coming to an end, here's a source list where to find these parts.   Of the remaining Hobby Stores, I know of none that stock this plane on their shelves.

eBay


The plane arrives in pieces


The Hacker Hotwings Evo 1000- It's $38 when not on sale, and there is free shipping when you spend over $69 (Catchy Number)  Otherwise it's $7.99  You may want to consider buying a second one and letting it sit on the shelf for a while.  After a few months, you may want an upgrade the plane and having one ready to go would come in handy.   Omni Models- A good USA Vendor
This is the most of what is considered the plane, it comes in a fairly small, very light box. The foam and motor mount are the main things you'll be using.


Control Horns- At just over $1 a pair,  this is worth the money, pick up a couple of extra just to have a spare.  This is from the same vendor as the plane so shipping is paid for with the plane order.


XT60 Connector - This comes from China so it may take a couple of weeks to show up. Buy a few pairs.    You will need wire strippers and way to connect two wires together.


Skywalker 30A ESC- Banggood sells these from time to time. Another very good one is the Turnigy Plush 30.  You can find them also on eBay for around $20.   Otherwise, the Skywalker which is nearly identical is around $11
Amazing Glue- You need this


UHU Por Adhesive- Not sold in the USA, so you have to buy it elsewhere.  It's worth the money.


Banggood


Motor-BR2212-  This motor will handle the plane without a problem- It's very powerful, don't let the low price fool you.  You will tear up the sky with this motor.
These are the newer generation motors called "Brushless motors."  They are 3 phase which means that there are three electrical wires that go to it. They are over 90% efficient.  This motor can spin at 15,000 RPM without a propeller on it.
Another benefit of the plane is the pusher prop design.  The motor is in the back of the plane leaving flexible foam up front in case of crashes.

Radio Control- There are many out there, select what works for you.  This one is inexepenvie and pretty good.


Radio Control- This is the FlySky FS-i6-  I happen to own one so I can talk about it from experience- It's a very good, low budget radio.  The only thing I don't like about it is that some of the parts fall off over time.  You're free to put whatever radio system you want in this plane and yes, you can easily spend up to $1000.  The radio and receiver are both around $40.  For each plane, you'll need a new receiver which you can also order from Banggood at around $10 each.

You need to order the right propeller for the plane and install it correctly.  Easy to get this step wrong.


Propeller- This plane takes an 8x6 Propeller, CW (clock wise).  There are small numbers on the propeller that say 8x6.  They have to point toward the direction of flight (forward).


Bullet Connectors


Bullet Connectors- This is what connects the motor to the speed controller.  You will need to solder this on to the ends of the speed controller and motor if this hasn't been done for you.  The reason why this is important is that the batttery frequently comes off during landings and occasionally it pulls the speed controller with it.  You need a second disconnect to make sure you don't break wires.


Pushrod connector Linkage- Oh yeah, you'll want this.  The good news is that it installs with an Allen wrench.    There are some that come with the plane, they aren't very good.


TowerPro 9g servo

Servos
- You'll need only two, but you'll have some spares.  I can't say that one brand is better than another when it comes to cheap servos, but I've seen Tower Pro around quite a bit.  You may want to be brand loyal because each servo has control arms that won't fit on other servos.
There are only three things that move on the plane, the motor.  From that, you can achieve flight, do amazing tricks and have a wonderful time in the air.   This is perhaps one of the simplest planes around because there isn't much to it.   Because the ailerons move, you can do rolls and spins.


Carbon Fiber Rods


Carbon Fiber Pushrods- Chances are fairly good you won't need this.  But if your connecting rods come up short you'll appreciate having this around    They can also get lost during a bad crash.  It's cheap and you're ordering other stuff, you may as well order this as well.  Eventually, you'll need it.


Lithium Polymer Battery (LiPo)


Battery-1.5mAh Lipo- There are many different manufacturers of batteries.  I've used these and they work great.  The only downside is that they need to be charged, used, and then recharged until all three cells seem to charge at the same rates.  Notice it has the XT60 connector.  This is one of the more common battery connectors these days.  You may want to buy two or three batteries.
This is a similar technology that cell phone batteries use. They are very light in weight compared to nickelcadmium battery (NiCd battery or NiCad battery).  Because of this these batteries, the Evo 1000 can exceed 30-minute flights fairly consistently. 
Balancing charger

Balancing Battery Charger- You'll need a way to charge your LiPo batteries.  I have one similar to this one, it works well.  What you think of as a battery is really three smaller batteries run in series (3S).  Batteries are rated by the number of cells they have, from 1 to 6.


Extra


Goop Adhesive, sold at Home Depot


Goop
Goop is a combination of silicone and other adhesives, possibly natural rubber. Since it's cheap, easy to find ( $5 at Home Depot)  and a decent adhesive you may be tempted to use this to glue your cores together.  I wouldn't suggest it.  It's not the strongest adhesive.
What this is amazing for is a covering around the front of the plane (the leading edge).  It turns the EPP foam into something that is softer and more rubberized.  It resists cracks and tears and absorbs the shock of impact better with it around the front of the plane ( the leading edge) and close to the motor mount.   It's amazing how well this stuff works.


30 Minute Epoxy

Motor mounts are made out of thin wood similar to balsa.  They can come apart fairly easily.  My suggestion is to coat it with 30-minute epoxy and let it dry.   You may also want to paint the motor mount before putting on the 30-minute epoxy.  Give it another color besides the dull wood color.   If you don't wish to do this the next best step is to coat the motor mount with wood glue.  I prefer the 30-minute epoxy, it gives a plastic coating to the motor mount.  Mine has never broken or come apart.  You can find this at a craft store such as Hobby Lobby.


Putting it all together

If you were to order all the parts at the same time, the plane would show up first and all the parts from Banggood would show up in a couple of weeks if not longer.  For whatever reason the UHU Por shows up fairly fast.

I know you'll  be excited to build this plane it's not the kind of thing you can assemble in a morning and fly in the afternoon.    The first build will take around 10 hours. I suggest doing it over the course of  3 or 4 days so that you allow things to dry.

The first time getting in the air is tricky.  You have to set your radio up right, and it's easy to set up the radio wrong   Once you're flying you need to know how to control the plane.  which is easier to do when it's flying away from you then when it's flying toward you.  The best way to learn how to fly an RC airplane without the frustration of watching your hard work come crashing down into the ground is to use an RC Simulator program.


RC Flight Simulator


This is the one I learned to fly on.   It comes with a controller and copies of many different planes.  Most of the planes are very expensive Balsa Wood models.  You won't get bored, and they actually have some pretty good lessons from instructors in the software.  There is a special edition that is also available.  You have to have a very serious gaming machine to run that software, whereas RF7.5 runs on just about any fairly modern PC.

Even after you set up the plane and spent untold hours on the computer learning how to fly a plane toward you, you'll still need help getting your plane in the air first time.   That's when you need to ask help from someone who knows how to fly RC planes.  They can help set up your plane and take it up for you the first time to make sure it's ready for you.

The Evo 1000 is less than a 3.5 foot plane, it weighs less than a pound and can usually be flown in empty parks.  Please don't fly it near the freeways or near crowds of people.  It's an ideal trainer plane.  Once you get it flying, you'll be hooked!


Total cash outlay for the plane including radio is under $150.    The plane without radio is less than $90.  As far as hobbies are concerned, this is an enexpensive one.


Friday, September 8, 2017

Buy two Hacker Hotwing Evo 1000s


NEW Hacker-Model HotWing 1000 EPP ARF EVO 02 39.4  HKPA0050

So good, you'll need two!


At face value, the Hacker HotWing  Evo 1000 is a winner.  If you do your best to follow the instructions (they can get a bit confusing) and build a stock plane, you will have a copy of the best under $40 planes available and perhaps one of the better under $100 planes around.

Though I wrote about the plane before, here are the top three reasons why the plane is so wonderful.

1. It's sporty-  This plane flips, spins and inverts without a problem.  The extra fins on the wing help it track with ease. It's so light that if you built it right, you shouldn't have to worry about it falling apart in midair.  That means you can get a little wild with pulling out of intense nosedives.   It's a lot of fun to fly and you will look forward to having this baby in the air!

2. It's a floater-  Following the stock build, you will have a very light plane.   On our warmer Southern California mornings, it seems to defy gravity and refuse to come out of the sky like a 5-year-old child refuses to go to bed at night.  There are many times I've set my timer for 40 minutes, taken the plane down and then discover that the battery is around the correct storage charge.   This means that it's possible to get close to an hour flight on a 1500mAh battery

I like to gradually take it up at very slow speeds, it handles slow speeds without a problem. When you come across a thermal or a good source of up draft the plane looks like it's taking the elevator up to the heavens. It's quite fun to make it fly so high with so little effort.

3. A trainer you won't outgrow-  There are numerous trainers on the market.  They are designed to suffer the sins of your learning curve. When you graduate to new planes the trainer usually gets put aside.  Perhaps you will help teach someone to fly and pull it from the mothballs?

The Evo-1000 at the stock build is forgiving, very forgiving.  If you're not being stupid or reckless, and you're doing your best to fly a plane with the best care you're capable of it will overlook most of your mistakes.  It can take a bit of a licking.

The Evo-1000 can fly very slow, it doesn't fall out of sloppy turns and is simple enough to help the total newbie learn how to fly.  This isn't a glider or sailplane flying experience where you have a rudder and elevators  Instead of an up-down, left-right flying experience you get the joy of ailerons with this no-tail plane.  This means that the plane is capable of spins and flying inverted.
When someone is done learning how to fly the Evo-1000 on their own they will keep flying it.Why give it up?  It's far too much fun!


Why I love the stock build

There are different flying scenarios for different folks. Some people want to take a plane out and have it hit close to 100mph.   They don't stay up in the sky all that long but the short time they are flying is certainly eventful.
I have smaller, much faster planes that can do an insane amount of tricks.   But, my favorite flying is getting something out that can explore the sky.  I like a floater experience that can take advantage of thermals and gusts of wind.  At times you can barely hear it on as it gradually climbs out of the park and starts gaining altitude. Then it hits a thermal and within seconds its up to four hundred feet.  I can turn off the power and watch the plane take a 4 minute gradual fall back to the ground. Just as it looks like it's landing I turn up the throlle to full, find an angle of attack and send it back up to 400'.  This time I take a nosedive down pulling out of it in the last 50 feet.  It's time for a few minutes of stunts and then it's back up to the clouds.  After about 30 minutes I am done flying and  move on to another plane.  I try to fly 2 to 3 different planes each time at the park. The Evo 1000 is always my favorite.


My mod plane
The underside of the modded Evo 1000


Paint-    I didn't something that I thought was pretty cool, at first.  I painted the back of the plane green and orange to match with the paint scheme on top.  It's not a bad idea, except against the blue sky the plane is darker on the bottom and thus can be hard to see.  If I were to do it again I would put Day Glow fluorescent green and orange paint on the bottom.    I do like the way the plane looks with the paint on the bottom.  If you're not planning to use laminate on the plane, you can forget this step. The paint will flake off with repeated landings.

Laminate-  I put on a durable 5mil laminate on the plane.  The laminate provides extra protection and help the plane cut way down on friction.  If you're going to go for a faster motor you'll want laminate as well.

Carbon fiber rods-
3mm rods on each leading edge.
3mm rod close to the motor mount (watch your tail weight)
6mm rod close to the nose

Had I to do it again, I would use 2mm rods to cut down on the weight.  With all these firm rods the plane is very rigid.  This means it doesn't flex when it spins.   This is a  plane made for stunts.

Metal Gear Servos-
Yes, they are sporty.  A bit too touchy however so I moved the travel down to 80% travel.  But yes, the fun never ends with fast action servos.

Motor-  I was good with the 1000KV motor like on my other plane.   I am worried about noise and I don't have enough space to make this plane a speed daemon.  The motor will be replaced soon with a D2826/6 with a 6x4 prop.


How different is it?

If you have a scale with "Floater" on one side and "Sporty" on the other side the stock  Evo 1000 60% floater and 40% sporty.   This moded version is more like 60% sporty and 40% floater. Battery life is cut down by 20% with this build.    It's a blast to fly and with flights lasting over 30 minutes  you won't need to bring a fleet of spare batteries.  On windy days this plane penetrates through the wind a bit better than the stock Evo-1000.   When you make a turn however it does catch the wind so be careful.

The big question is do you really need two of these planes?  Yes, they are different enough from each other that it doesn't feel repetitive.  But, similar enough to appreciate the finer qualities that this model offers.

This plane just screams when it's flying.  It's a tad bit heavier, a lot more rigid and loves any stunt you can throw at it.

Buy two and save

The hot ticket is to buy two from Omni Models  (Ebay link) (Website Link).  Pick up a set of these while you're at it.   There is free shipping and no tax if you happen to live out of state. (They are in Illinois).  My advice is to build the stock build first, fly it for a couple of months then decide what to do about the modded plane.


If you can wait a couple of weeks for stuff to show up from China this is a pretty good connector.

These are the motors I use.  You can get


PopWing 900mm, same as Turnigy TekSumo


Compared to the Turnigy Tek Sumo/ Tech-One Pop Wing


The Turnigy Tek Sumo/ Tech-One Pop Wing are essentially the same plane.  They are a tad bit smaller at 900mm compared to the 1 meter of the Evo 1000 plane.  They both  have a pre-cut battery compartment which seems to ideally work with many 1500mAh 3S LiPo batteries.  And yes, during a nose crash you'll be gluing the nose back together.  This is the weakest feature of the Popwing/ Tek Sumo.  When the Tek Sumo/Pop Wing is dialed in right, it flies very nicely.  It seems to thrive on having a  heavy battery near the nose.  If you put the wrong battery weight in the plane won't track.  Worse yet it can tail spin in poor turns.

The Evo-1000 seems to be balanced better.  It doesn't suffer from needing exact battery weights like the Pop Wing.   It just feels a lot more stable in the air. When you have it tail heavy it still flies but will wander around a bit more.


Ripped in half?  Nothing a little glue can't fix.


Testing the "Indescrutability" of the plane.


The plane says "Nearly indestructible" on the box.  I, unfortunately, had to push it to its limits.

Oh, the day started off fine.  I had a 2200mAh battery that needed to be used up so I attached it to this plane.  It's a newer battery which made it lighter than its older counterparts but heavier than my usual 1.5 or 1.8 amp batteries.  Despite the extra weight, it flew well.  A bit clunky but it was okay.
Then it hit a thermal and went up into the clouds. And then it was gone.   I went around the neighborhood for an hour looking for it.  I did manage to find it a couple of blocks away in someone's driveway.

The damage- The plane ripped in half, one servo was broken, parts of the  foam were missing.  But it came home with me, and I've actually fixed worse.   I ripped out the fiberglass spars and won't put them in any more planes. My secret combination of glue is  UHU Por and Gorilla Glue.  The Por bonds tightly and the Gorilla Glue fills in dwells.   Then I cut in grooves for 2mm spars both on top and bottom with carbon fiber rods.  Yes, the plane isn't as pretty but the flex is gone.

It's back to nearly the same condition it was in before the crash.  If anything it's better with the carbon fiber rods adding for stiffness.


How to build the Evo 1000


Since the instructions aren't the best, here's my suggestion how to build it.

Day 1 (5 minutes)
Take around 3 water bottles per wing and weigh the wings down overnight on a flat surface like a kitchen table. Keep the wings out of the sun
Put bottles on plane overnight to flatten it out.


Day 2 ( 2 hours)
Let  UHU Por stand for 10-15 minutes, then attach cores


Take a generous amount of UHU Por and make a bead on each side of the wing's center.  Let it dry for around 10 to 15 minutes.  Then push the two pieces together.  Use long pins to lock the cores solidly together.  Keep the plane out of the sun and let it cure for around a day.


UHU POR Glue


Get your electronics together.  Make sure the motor and ESC has the proper bullet connectors and the ESC is equipped for the right connector for your battery.  Do a nice job with this step so that you don't have it coming apart later or having shorts.  Hook up your receiver, bind it to your radio and center your servos.  You do not need metal gear servos for this build. The generic 9g servos are fine.
Use wood glue to glue the motor mount together. After it dries for around half an hour I like to use 30-minute epoxy to coat the mount.  It makes it very durable but use it sparingly because it will add weight to the tail.

Day 3 (2 hours)
Image result for control horns
Buy better control horns, it's worh the money.

There are some parts that come with the kit that are worthless. You'll need better control horns and something like a DuBro's EZ connect for the control arm to mount the 2mm carbon rod. The carbon rod and little connector for the control horns are fine, but use a heat gun instead of a match to secure it.  You may need a bit larger piece of  heat shrink than what comes with the kit.

It's time to layout your wiring on the plane.  Get the servos installed but don't glue them yet. Put the control arm on (making sure it's still centered) and figure out where you would like the control horns. Cut the servo wire routes into the plane.


This attaches control rods to the servo horns


Next it's time to install the spars.  If you have 2mm carbon fiber rods in 1000mm lengths  handy, be sure to use them instead.  Don't use larger diameter carbon fiber. 2 or 3mm is fine.

Once that is installed and the servo wires are cut in, you can start gluing.  Glue your control horns, your servos, your motor mounts, your carbon fiber rods/ribbons.  Last glue in your motor mount. It doesn't matter if it's a bit sticky from the epoxy.

Let everything dry for 24 hours.

Day 4 (2 hours)
Remove the pins you installed on day 2.  If the servos are well glued in,  install the control rods. Attach the motor to the mount. connect the speed controller and figure out where and how you want it mounted to the plane. You can use zip ties and velcro to hold it in place.   I like to keep mine inside the motor mount fins.

The instructions suggest cutting a spot for the battery up front.  I DO NOT LIKE THIS IDEA.   You need the foam in case of crashes.  Instead, buy heavy duty velcro and create a 4" strip from the nose to where the first compartment is located. Using a combination of zip ties and velcro straps you can strap the battery down to the velcro.   This is my little secret to the plane, experiment to where the best battery placement is for your plane.  Use UHU Por to glue the Velcro to the foam.

At this point you can finish building the plane. Figure how to do Elevon mixing on your radio.  If you've never done this before this will take some time. Both ailerons need to go up when you pull back on the stick and  down when you push  up, left the left aileron needs to go up while the right goes down. Attach the propeller making sure the little numbers on the prop face the direction of flight.  Glue your winglets on, use Por and the pins once again using the same technique.   Let it all dry overnight. If you leave the pins in you can get away with  the winglets not being dry for your first flight.  Remove the pins after a few days.

If you're conservative with the build, and you didn't add extra weight to the back, put a 1500mAh 11.1v 3S battery  Center it between the nose and the first compartment.  Keep your elevons perfectly flat for your first flight.  It should fly.  You may want to put in 3 clicks of uptrim after your first flight.

You'll like the first plane, so why buy a second one?  It's because it won't be long before you figure out a few things here and there you would like to change about the plane.  Once you stray from the script, it's not the same plane.  So, one is your stock plane, and one is your mod plane.

This plane was designed exceptionally well, it's a steal at the price that it sells at and you're trully will love it!


Friday, July 21, 2017

Hacker Hot Wing 750

The Hacker Hot Wing 750 -McFloater

Image result for hacker hotwing 750


After my glowing review of the Hacker Evo 1000 you would think that everything Hacker comes out with is gold in my book?    Well, I'm a fan.  The 750  is a no-brainer when it comes to planes.  It's something that is different than everything else out there. I don't think there is any middle ground, you'll either love it or hate it.

The Turnigy Bonsai

Image result for turnigy bonsai
The Bonsai is a fun plane, it's fast, agile and can do tricks faster than you can think about them.  Its wingspan is 600mm versus the Hacker's 750.   There is also a heck of a lot less surface area on the wing.   When you fly the Bosnia, trust me, you fly it.  Every second it's in the air you're on the controls. The Bonsai is more like a Formula 1 race car and the Hacker is more like a Corvette.  It really comes down to what type of flying experience you want.

The Hot Wing 750 is similar in cord size to the Hot Wing Evo 1000.  I wrote about it before and simply love that plane. The 750  seems like it's the same plane as the  1000 with the wings cut down lengthwise.   What's left is a stubby plane with lots of surface area.  It floats nicely and does some tricks, but not to the degree of agility that the Bosnia has. The Hot Wing 750 provides more stability, better float, a larger plane and a higher degree of predictability in the air.   When setup right, it's a bit more forgiving which makes it an ideal plane for a newer pilot.  It can be a bit wobbly in the air thus I still suggest the Hacker Hot Wing Evo-1000 as a better first plane.  One tip I can give you is to put the battery closer to the nose of the plane if you find the plane to be too wobbly.

Flight characteristics of the Hot Wing 750


Takeoff for the 750 can be a bit squirly.  You will want to toss it with half throttle if not less with a 3S battery.   The thing I've discovered about smaller planes is that you definitely need to put more care into your toss because a lopsided toss may soon find the ground or it will send you off in a direction you weren't planning on going.  Keep the plane parallel to the ground with the nose up a bit.  I find it's easier to work the controls with my right hand thus I tend to do a sloppy left-handed toss.  After some practice, most tosses work out fine.

At the end of the park I like to fly at there are trees about 70 feet up..  Thus I work on getting well above the treeline well before I get to them.  My first 15 seconds of flight is usually around 40% throttle.  After my first turn it's time to tone down the throttle.  I usually dial it back to 30% to 20% depending on the weather conditions.  The nice thing about the 750 is that you don't need very much throttle to keep in airborne.  Therefore I am getting 35-minute flights on a 1500mAh 3S LiPo.  Once it's in the air you have a lot of options.  You can troll around the sky until the battery dies, or you can start to axis rolls and loops.  I prefer to shoot it up to around 200 feet and start searching for thermals or wind currents.   When it finds a thermal it's a bit scary the first time. Due to its large surface area it can catch lift and find itself gaining 100 feet in a matter of seconds. Another option is to shoot this plane up to 400 feet, kill the power and let it glide back to the ground.  It can act like a glider, taking 3 to 5 minutes to return back to the point where you need to power it up again or land it.

Though it's not a sports plane, the smaller wingspan make it a bit sporty, ready for tricks.  The 750 inverts without effort.  It handles flips and rolls well.  It's not snappy like the Bonsai but you won't be bored.  Thus it's a good step-up plane to get after a trainer.  It's also the perfect size to throw in the trunk and take with on a trip.  Living in Southern California we go to Las Vegas a few times a year.  This is a plane I can take along because it doesn't take up too much room.


Required Mods


Seriously, the servo control rods and control horns are garbage, don't even waste your time with them.  You'll need to buy some better control horns  I would suggest getting some DuBro's EZ connects as well.  Once you figure out how to connect it, you'll have total control of control surface.  You may need some spare 2mm carbon fiber rods as well in case the supplied arms come up a bit short.  If you're into RC flying you should always have a supply of  carbon fiber rods, especially 2mm.

The carbon spar that comes with the plane is a bit weak.  I would have buried a 4mm carbon rod in the center of the plane.  But, I use the one that is supplied with the plane and thus far, no complaints. I don't see the need for putting carbon fiber in the leading edge or laminating the plane.  I do use velcro in the front of the plane to hold the battery along with straps.


Dialing in up-trim (Reflex).


When you're playing golf you can dial a 250 yard shot without thinking about it.  But when the green is 180 yards away with sand traps all around it,  you will need to be a bit more certain about your approach.   You're not looking for a hole in 1 but you would like to get the ball on the green on your first stroke.  This plane has a sweet spot about 180 yards out, and yes it's surrounded by sand traps.  When the trim is wrong and it flies nose heavy,  it's not a lot of fun. When it's slightly tail heavy it will still fly,   but it won't fly straight.  You'll know you have it wrong because it will have all the charm of a flying pizza box.   When you dial it in, you'll know.  You can almost hear the choir singing "Halalua."   When it's dialed in, it's a great plane!

So, where do you start?   My suggestion is to start with the elevons perfectly flat then dial them up no more than 3 degrees.  Until you get your plane dialed in you should stick with one style of battery.  If you cut the power  at 150 feet and the plane is on the ground 15 seconds later your plane is nose heavy.  If it's having problems tracking its tail heavy.  You can dial it in with trim on your radio until you get it just the way you like it  I tend to like to reposition the control rods so that the trim is set in manually.  I try to use as little trim as possible on the radio.

Slightly confusing build


The instructions are better than many of the Chinese planes I've purchased, but they can get confusing.  You'll want to use UHU Por for gluing the plane together.  It's a contact adhesive that works extremely well for EPP foam.  Just follow the instruction for the placement of the spars.   This may not be the very best first plane to build because the instructions are a bit sketchy, thus if this is your first build you should get help from a friend who has building experience.   The overall build difficulty on this plane is fairly low.

The Hacker Hot Wing Evo-1000.


This 1000mm plane is the big brother of the 750.   It's a different beast altogether than the 750.   I still love the 1000 a bit more.  This plane has fins on the leading edge which give it a bit more tracking stability in the air.   For a first plane, the  Evo-1000 is a much better choice.

The 750 isn't a watered down version of the 1000.  The 750 has different flight characteristics.  I've outfited mine with a 7x4 prop and a slightly sport 1400 kv motor. A 30a speed controller is all you'll need.   You really don't need digital, metal gear servos for this plane.

OmniModel, a great vendor!


OmniModels has replaced HobbyKing in my book as my preferred vendor.  They have reasonable shipping rates and great customer service.  If your next order is coming up short  of the $69 needed to get free shipping try throwing on the Hacker Hot Wing 750.  I bet you have most of the part you'll need for this plane sitting around. You will enjoy the 750!

Radian Motor Upgrade

If you have a Radian I'm sure that you love it!  The Radian is a legendary 2-meter powered glider.   But as I'ms sure you know, everything from behind  the motor is wonderful.  But, big issues occur when you get to the motor forward.  Chances are if you have a Radian that isn't flying right now it's time to check out some new options.

Radian= Proprietary motor mount


The Radian uses a proprietary motor mount to mount it to the fuselage.   Thus, you'll need to buy the correct motor for the plane which is large, heavy, overpriced and a bit underwhelming.  For the over $40 you'll shell out for the Radian motor you could be into a very nice Turnigy D3536 for about half the money.  Is there a way to opt out of the  Radian motor?

Radian Motor Mount- Small Parts CNC.


With this motor mount, you'll be able to hook up an aftermarket motor on your Radian.  Oh, happy days!   There is one thing you have to look out for, the motor has to be front facing. This is very specific.  This means that the four holes where you mount the motor have to be on the same side as the longest side of the motor shaft.  The vast, vast majority of outrunner motors are sold with the mount side and shaft side on opposite ends.   I believe this is because this is how most Drone motors are mounted.  This is the proper mounting orientation for pusher aircraft, but the traditional aircraft with a motor upfront like in a Cessna need the shaft sticking out the opposite side of the motor.


Moving the shaft


Update-Don't move a shaft. Buy a motor with wires near the side of the shaft that sticks out.


You could use the standard Radian spinner and prop, but why?


The standard Radian spinner is perhaps the worst part of the plane.  The collet is held down by a hex socket head.  This alone makes me suspect of the spinner.  Time to move to better spinners!  The first thing you'll need to know is the shaft thickness of your motor so that you can get the right collet for a new spinner.  The proper diameter for the spinner is 50mm.    I put a 30mm on one of my Radians and though it works it looks kinda small.   So you'll need to find a 50mm spinner.  I selected this one from Radical R/C.

http://www.radicalrc.com/category/Spinners-Folding-APC-288

It's the one titled

Aluminum Spinner Folding Prop Hub APC 50mm OD

If you're using  a 3mm shaft of you'll need to buy the smaller collet toward the bottom of the page for 3mm and 50mm OD spinners.

To make it easy on you, all you need are Gamfan folding  propellers.

https://www.banggood.com/Gemfan-Electric-Nylon-Folding-Propeller-7060-7540-8050-9050-1060-1180-1280-1380-1-Pair-p-983784.html?rmmds=myorder

With this larger, heavier motor there won't be a problem driving those large 10x6 propellers, or could there be a problem?  See closing notes at the bottom.


Installation

Started with a Fli-Power motor.   I would love to say I put a lot of thought into buying this motor.  Nope, I bought it when I was placing an order for Carbon Fiber rods.  It was on sale. The thing is a huge 5-ounce motor.  It's specified as a  2820/4.  It has a 5mm shaft and puts out 690 watts.   The stock Radian motor is about an ounce lighter and is 960KV.    This motor has a KV of 1450 which sounds better, but it can be a problem if not used right.

The motor mount fit


As you can see from the photo, the four screws lined up in the motor mount without a problem.  The four holes are what fits on the Radian's proprietary mount.    The other image is of the motor installed.


As you can tell, there isn't a lot of space between the motor and the fuselage.  After my first attempt of installing the motor I got the wires lined up right and things were fine.  The motor spins freely.  But there isn't a lot of breathing room.  Which is another consideration of why I will limit the amount of power the motor gets. 


Heavy Duty Collet


This collet is not coming off!  I drove the collect nut down with a socket.  It's on for good!  Not like the original Radian collet where the hex nut gave out and the entire spinner fell off.  It may be hard to tell but give a little space between the firewall and the bar the bar the propellers attach to. The entire bar is supposed to spin freely. 


Spinner and folding propeller


Flight characteristics


I have two Radians.  The first one I put the Small Parts CNC Radian Motor Mount into was a motor that was lighter than the original Radian motor.  That made the plane a bit tail heavy.   The motor was fine, it was up to the task and has no problems whatsoever powering the Radian.  It made the Radian a bit more of a floater than your normal Radians which isn't a bad thing.

For my older Radian with road rash and a two time rebuilt fuselage I grabbed a motor I had laying around.   This one is between an ounce and two ounces heavier.   The aluminum spinner also puts on a little more weight.  A nose heavy plane isn't the end of the world.    What I haven't done is fly it yet with a 3S 2200mAh LiPo.    I have opted for the smaller 1800mAh batteries instead.

What I have noticed is that at 25% throttle it will climb into the sky to reach maximum altitude.   This is at a comfortable angle of attack, not a 90 degree climb like the Goodyear Blimp.   I have 9x5 Propeller on the plane and will move to a 10" prop fairly soon.  The motor is way overpowered for this plane.  I rarely take it above half throttle.

Tips on building your own Radian


The Radian is actually a very good value, when you buy it in pieces and build it yourself. I found the best prices were on eBay.  The fuselage is less than $30, the wings are around $40 and the horizontal stabilizer is only $12.   Throw another $7 for the decal set and for less than $100 you've got a plane without the motor and spinner.  As for servos I threw in a set of Hitec HS-81.   You will need a longer control arm than what comes with the servos for the elevator rod.    You can put in 40 or 50 amp speed controller for your motor.  Be sure to cement your servos into the fuselage. I use 30-minute epoxy for this and for repairs to the foam.

Here is the owner's manual.

http://www.parkzone.com/ProdInfo/Files/PKZ4700-Radian-Manual.pdf


Read through the manual, set the plane up right, ask for help if this is a little beyond you. The Radian is a big plane, you'll need some space to fly it.


Options for the Radian


If you're into hassle free flying you can buy the premade kit that is "Bind and fly"   Though it's a bit pricy its a very nice kit.   But, sooner or later you'll be addressing the motor, spinner, propeller.   If you like to build your own planes the idea of buying a kit isn't appealing.   For my second Radian I painted the plane and put my own decals on.


On both Radians I put lamination on the wings.  On the red white and blue one it's all over the plane.  Part of the fun of the hobby is putting the pieces together and making a plane truly yours.


Here's the list of parts I used for the latest motor modification.  I can say that all these pieces will work together.

The Motor
Fli-power
Model Number: 2820-4
Weight: 136
KV: 1450
Max Watts: 690W Shaft
5 59.5mm
Max Current: 47.6A
No Load Current 10v 2.1A

Mine was a closeout. It's most similar to this model

http://www.rcfoam.com/rc-model-airplane-engines-and-rc-electric-motor-mounts/fli-power-brushless-motor-2820-1450kv-p-676.html

I would also check out this Turnigy motor.

https://hobbyking.com/en_us/turnigy-d3536-5-1450kv-brushless-outrunner-motor.html
You will need to push the shaft forward.

This mount from Small Parts CNC

http://smallpartscnc.com/index.php?route=product/product&filter_name=radian&product_id=97

The spinner from Radical RC
http://www.radicalrc.com
SKU/Part No: MPIPA50

Folding Propeller
Select either a 9050 or 1060
https://www.banggood.com/Gemfan-Electric-Nylon-Folding-Propeller-7060-7540-8050-9050-1060-1180-1280-1380-1-Pair-p-983784.html?rmmds=search


Other thoughts
If you go the route of buying the parts and putting in your own motor it's either slightly to very much  more expensive than buying the kit parts.   That's the bad news.  The good news is that you shouldn't have to mess with your Radian that much.

The Radian is a great plane, people seem to really love it.  I love mine.   BTW, original  my motor, spinner and two sets of props are for sale.  They are fairly new. 

Thursday, June 22, 2017

Krylon Foam Primer


Something other than all white


I don't know about you, but I simply can't do another all white plane. I was explaining to one of my friends that many planes are offered in all white EPO foam and to make up for the fact that they look boring they either include or sell you decals.  Often your plane comes out looking like something you would have loved when you were 14-years-old.


The problem with paint


I've seen many people paint their planes only to have paint scratch off.  I know I am taking style points off but I like laminating my planes.   Thus I am free to paint my planes and then clear laminate over the paint.  Sure my colorful planes look like they are wrapped in Suran Wrap but it certainly beats yet another white plane.

The problem with spray paints

The spray paint on bare foam will eat the surface.  It can give an alligator skin look to it, which can look cool if you're into that.   I wanted to go for something different so I looked around.


Krylon Short Cuts


Image result for krylon short cuts


If you don't mind paying a dollar per ounce of paint Krylon shortcuts can be sprayed directly onto the foam. It comes in many colors, but maybe not enough to satisfy all needs.   If time is more important to you than money this is a step that can save you a couple of days.  But if you have more exacting color needs, and you can take your time painting your planes there is a new option.

Krylon Foam Primer


NEW! Styrofoam Safe Primer 12oz-

Simply give your plane or whatever foam project you're working a couple/few coats of primer.  There is a 24 to 48 hour cure time that you need between your last coat of primer and your first coat of paint.   Dry to the touch and cured aren't the same thing.  If it's an important project you may want to wait the full two days.


Primer on the plane, notice the surface isn't etched?


I've tested the foam primer on a couple of projects and the first words that come to my are "Excellent" and "Need More!"   You can spray it onto your foam without worry of it getting eaten. The only downside is the primer color is the exact color of the EPO foam, so the changes are very minor.  So far there hasn't been any burning issues with the foam.

After my first attempt with the primer I gave my smaller plane only 1 day cure time.  It was a hot, dry June day in Southern California.  So, nothing stayed wet all that long.   My coats of paint, heavy or light didn't harm the plane one bit.


First coat of paint, no issues.  And this was the cheap paint from Walmart!


Paint on foam can be flaky.


The surface of EPO foam is soft.  It can easily be warped or bent. Unlike metal which doesn't change shape easily the surface of the foam isn't ideally suited for paint.  So, whatever you put on the foam may flake off.    This is why I use a low melt laminate like "The New Stuff" by Aloft Hobbies.  If you don't mind the shiny plastic cover then things are good.    I spend the most amount of time staring at my plane when it's in the air.  And yes, I know it sounds like hype but I've flown a plane with and without the laminate and it definitely went faster with lamination on EPP foam.  EPO foam is rather slick so I don't know how much of an impact it will have on the plane's drag.    I will say that in crashes the areas that had the New Stuff on it seemed to hold up better.  It was a little extra protection.

Otherwise, if your paint job faces abbrassion it will wear off in the areas that get rubbed.

What if you want to mask off an area?


One tip I found that looks useful is to put masking tape on your t-shirt before applying it to the surface.   This will further deaden the adhesive.


Overall


The Krylon Foam Primer is a winner.  But, it's hard to find.  You can buy it on Amazon.  The best prices I've found were at Hobby Lobby, especially with the 40% off coupon.

 Links:


Hobby Lobby Link
http://www.hobbylobby.com/Crafts-Hobbies/Stencils-Craft-Paints/Mediums-Finishes/Krylon-White-Craft-Foam-Primer/p/80785852


Amazon:
https://www.amazon.com/Krylon-43264841-Spry-Foam-Primer/dp/B01K13FSDE/ref=cm_rdp_product_img


Aloft Hobbies- The New Stuff low melt lamination.

http://alofthobbies.com/new-stuff-laminating-films.html


Tuesday, May 30, 2017

How to get your Drone / RC plane out of a tree

A bad end to a good day.

Time to stress


A plane/drone  in a tree is a stressful situation. It happens to the best of pilots and nearly everybody has at least one plane in tree story to tell.  If you aren't fortunate enough to live close to where the plane is stuck you may end up losing the plane forever.   So, drastic action is required if you want to save it. The battery will wear down and the plane/drone will suffer the effects of weather.


Height is an issue


Planes 30 feet and under are much easier to recover than when they are up over 40 feet and up.  Even with good tools you'll need leverage.    You will also have to be careful how you get the plane/drone  out of the tree so that you do as little damage as possible.   When it comes to getting planes/drones out of trees there are good ideas and bad ideas.  I'll start with the bad ones.


Climb up the tree and get it yourself.


When I was growing up, a family a couple of blocks over lost their father one afternoon.  He was trimming the trees himself and hit a power line by mistake.  They aren't certain if the shock killed him or the 40-foot drop.  I can't tell you how sad the kids were and how the loss really hurt the entire family.    If you are an experienced tree climber and the plane/drone is well within your wheelhouse then don't let me talk you out of it.   If not the medical bills you're risking will outpace the cost of your entire RC plane/drone collection.   Broken arms and legs are one thing, a broken back can never really be repaired.   You'll never be the same.   So please, safety first.

Throw rocks at your plane/drone


It's going to come apart in pieces which is fine if you just want the motor and speed controller and other goodies. Perhaps you won't have to resort to this.

Better ideas


Get some leverage on it from the ground.


If you can get a stick under it and push it out the way it came in  that will be helpful.   When I landed my plane in a tree 60 feet up, this is what I did.  I'll tell you the story.

My plane was acting funny, pulling to the right so I tried to compensate with trim.  This caused me to put the plane in a spiral about 100 feet up. It landed perfectly in a tree, 60 feet up.  The plane was perfectly wedged in between branches.   Since it was FM the radio would keep the plane calm. When it was off the servos started twitching nervously.   Since the tree was near my house I put the radio under a bush and started to look for solutions.

Solution #1  Pull rods


I used these to pull electrical in my attic.  I've had a few too many desserts in my life and the thought of my fat ass squeezing between narrow beams while stepping on studs didn't work for me.   These rods worked great.  I got the electrical wires pulled without a problem.   However, that was a horizontal pull and the plane is up vertically.  By the time I screwed five rods together it wouldn't stand up straight, it just bent.  For the record that was 15'.

Home Depot PVC Pipe


Someone posted on a forum that they used 3/4" PVC pipe and that they could get it to up o 60' in the air.  I tried this, after a few pieces, it also bent.  However, discussing the issue with a buddy he said he had success by putting a piece within a piece.  He had 1" tubing and put in half inch PVC tubing on the used a half inch tube inside of an inch tubing inside, when they overlapped he would tape it with duct tape. My buddy said he could get up to 60 feet this way.   I haven't tried it, but if you're desperate then this doesn't sound like a bad solution   The inner tube braces the outer tubing.  Buy the longest lengths you can get such as 16'.  You can easily find ten feet.  Push the smaller pipe at least a few inches in the bigger one, put tape on the areas they overlap. This is going to get heavy once you get four lengths in so you may need someone to help you get it up.   My buddy said he did this and it worked fine up to 60'

What worked for me.


 The single PVC pipe idea didn't work.  What did work was tying the extension pole from Home Depot as seen above taped with duct tape  to another extension pole.  The second one was lighter.  I stood on a ladder and barely touched it nearly 60 feet up.  It took about 10 minutes to position the pole within the right area.  I was able to give it a light push.  It moved.  The with the breeze I was able to give it a second push.  The question I had was how it would fall out of the tree?  The answer was straight down, right in the middle of my forehead.   Good thing it hit something soft! The plane was fine, except the battery was dead and not recoverable.  I kept the new pole because I know I will doing this again.


Other options


Tree trimming


Perhaps you can reach a branch 20 feet up on the tree or lower with a pole saw and cut the branch down?  It's probably going to be fairly thick so plan on having this take a while.  The branches may help protect the plane/drone as it falls to the ground.   If this is on private property you, of course, want to get the permission from the property owner before you do this.  If it's in a park or land where the property owner can't be identified easily then it's up to you.  My thinking is that branches grow back.  Just be certain to clean up the tree branches when you're done.


Baseball and rope


"Take me out to the ball game. . ."  Remember those years playing high school baseball?  No?  Well it's time to live your glory days as you throw a baseball that is taped to a nylon rope up a tree.    It sounds easier than it is I'm sure.  The secret they say is to lay the rope out in a zig-zag pattern on the ground.  You take the rope to the ball with duct-tape and stand there throwing the ball up the tree.  Heck, have fun with it, offer $10 for the first person to make it over the branch.  When it comes down the other side you're supposed to grab both ends  of the rope and aggressively shake the branch so the  plane /drone falls out of the tree.


Wait for it to fall out of the tree.


If this is stuck in someone's backyard this may be  your only option. Sooner or later it may fall from the tree with a good stiff wind and if you leave them your phone number they'll call you.  It may take hours, days or months.


Call a tree trimmer


If you have a balsa wood plane or one that is delicate or perhaps loaded down with a lot of FPV gear the notion of it falling 60 feet to the ground can mean the plane/drone will get damaged beyond repair or the equipment onboard will suffer too much damage. This is when you get your smartphone out and start calling all the local tree trimmers in the area.  Most likely you'll hear "I can get to you sometime next week, or the week after, I don't know, let me look at my schedule."   Since batteries will die and never will be able to be charged again someone who can get to it today is more desirable.   This is a 15-minute job for them in most cases, and an extra $50 will be plenty persuasive.

Flying Clubs


Many flying clubs know of guys who have skills climbing trees to get planes/drone out.  Some people have little side businesses doing this.   You may want to call your local club and ask a question or two. They may take a few days getting back to you however.

The last resort


It may be too late for this for this plane/drone but in all of your builds put your name and phone number on your plane/drone.   I've found 3 RC planes on my morning walks over the years.  None have had phone numbers. The last one belonged to a friend of mine, months later I told him I had it in my garage.  He was happy to get it back.    Chances are very good that someone will find it and return it to you if they know how to contact you.  If it never comes back to you, well, write it off and move on. I'm sorry to say sometimes that's all you can do.   You can attach a note to the tree stating your name and phone number and the plane/drone  in the tree above belongs to you.  If an honest person finds it they will be in contact with you.


The fun of buying used planes

  If you like to buy and sell used planes.  Occasionally you can find really good deals. I mean, mind blowing deals.  Most of the time you d...