So good, you'll need two!
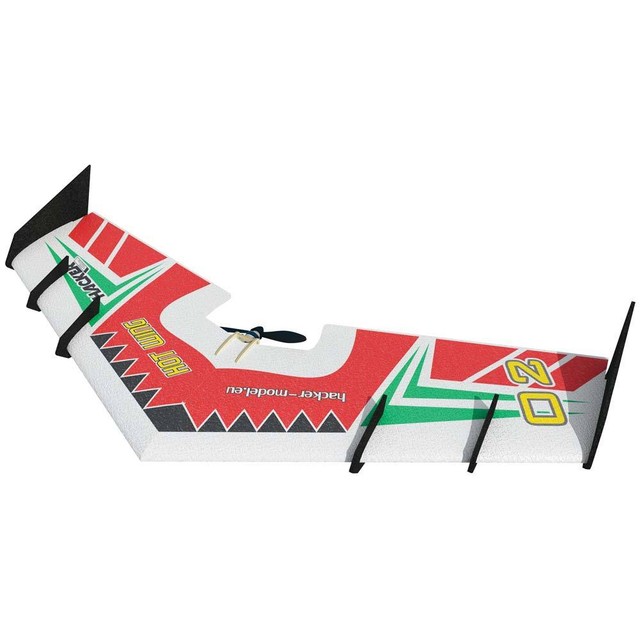
At face value, the Hacker HotWing Evo 1000 is a winner. If you do your best to follow the instructions (they can get a bit confusing) and build a stock plane, you will have a copy of the best under $40 planes available and perhaps one of the better under $100 planes around.
Though I wrote about the plane before, here are the top three reasons why the plane is so wonderful.
1. It's sporty- This plane flips, spins and inverts without a problem. The extra fins on the wing help it track with ease. It's so light that if you built it right, you shouldn't have to worry about it falling apart in midair. That means you can get a little wild with pulling out of intense nosedives. It's a lot of fun to fly and you will look forward to having this baby in the air!
2. It's a floater- Following the stock build, you will have a very light plane. On our warmer Southern California mornings, it seems to defy gravity and refuse to come out of the sky like a 5-year-old child refuses to go to bed at night. There are many times I've set my timer for 40 minutes, taken the plane down and then discover that the battery is around the correct storage charge. This means that it's possible to get close to an hour flight on a 1500mAh battery
I like to gradually take it up at very slow speeds, it handles slow speeds without a problem. When you come across a thermal or a good source of up draft the plane looks like it's taking the elevator up to the heavens. It's quite fun to make it fly so high with so little effort.
3. A trainer you won't outgrow- There are numerous trainers on the market. They are designed to suffer the sins of your learning curve. When you graduate to new planes the trainer usually gets put aside. Perhaps you will help teach someone to fly and pull it from the mothballs?
The Evo-1000 at the stock build is forgiving, very forgiving. If you're not being stupid or reckless, and you're doing your best to fly a plane with the best care you're capable of it will overlook most of your mistakes. It can take a bit of a licking.
The Evo-1000 can fly very slow, it doesn't fall out of sloppy turns and is simple enough to help the total newbie learn how to fly. This isn't a glider or sailplane flying experience where you have a rudder and elevators Instead of an up-down, left-right flying experience you get the joy of ailerons with this no-tail plane. This means that the plane is capable of spins and flying inverted.
When someone is done learning how to fly the Evo-1000 on their own they will keep flying it.Why give it up? It's far too much fun!
Why I love the stock build
There are different flying scenarios for different folks. Some people want to take a plane out and have it hit close to 100mph. They don't stay up in the sky all that long but the short time they are flying is certainly eventful.
I have smaller, much faster planes that can do an insane amount of tricks. But, my favorite flying is getting something out that can explore the sky. I like a floater experience that can take advantage of thermals and gusts of wind. At times you can barely hear it on as it gradually climbs out of the park and starts gaining altitude. Then it hits a thermal and within seconds its up to four hundred feet. I can turn off the power and watch the plane take a 4 minute gradual fall back to the ground. Just as it looks like it's landing I turn up the throlle to full, find an angle of attack and send it back up to 400'. This time I take a nosedive down pulling out of it in the last 50 feet. It's time for a few minutes of stunts and then it's back up to the clouds. After about 30 minutes I am done flying and move on to another plane. I try to fly 2 to 3 different planes each time at the park. The Evo 1000 is always my favorite.
My mod plane
 |
| The underside of the modded Evo 1000 |
Paint- I didn't something that I thought was pretty cool, at first. I painted the back of the plane green and orange to match with the paint scheme on top. It's not a bad idea, except against the blue sky the plane is darker on the bottom and thus can be hard to see. If I were to do it again I would put Day Glow fluorescent green and orange paint on the bottom. I do like the way the plane looks with the paint on the bottom. If you're not planning to use laminate on the plane, you can forget this step. The paint will flake off with repeated landings.
Laminate- I put on a durable 5mil laminate on the plane. The laminate provides extra protection and help the plane cut way down on friction. If you're going to go for a faster motor you'll want laminate as well.
Carbon fiber rods-
3mm rods on each leading edge.
3mm rod close to the motor mount (watch your tail weight)
6mm rod close to the nose
Had I to do it again, I would use 2mm rods to cut down on the weight. With all these firm rods the plane is very rigid. This means it doesn't flex when it spins. This is a plane made for stunts.
Metal Gear Servos-
Yes, they are sporty. A bit too touchy however so I moved the travel down to 80% travel. But yes, the fun never ends with fast action servos.
Motor- I was good with the 1000KV motor like on my other plane. I am worried about noise and I don't have enough space to make this plane a speed daemon. The motor will be replaced soon with a D2826/6 with a 6x4 prop.
How different is it?
If you have a scale with "Floater" on one side and "Sporty" on the other side the stock Evo 1000 60% floater and 40% sporty. This moded version is more like 60% sporty and 40% floater. Battery life is cut down by 20% with this build. It's a blast to fly and with flights lasting over 30 minutes you won't need to bring a fleet of spare batteries. On windy days this plane penetrates through the wind a bit better than the stock Evo-1000. When you make a turn however it does catch the wind so be careful.
The big question is do you really need two of these planes? Yes, they are different enough from each other that it doesn't feel repetitive. But, similar enough to appreciate the finer qualities that this model offers.
This plane just screams when it's flying. It's a tad bit heavier, a lot more rigid and loves any stunt you can throw at it.
Buy two and save
The hot ticket is to buy two from Omni Models (Ebay link) (Website Link). Pick up a set of these while you're at it. There is free shipping and no tax if you happen to live out of state. (They are in Illinois). My advice is to build the stock build first, fly it for a couple of months then decide what to do about the modded plane.
If you can wait a couple of weeks for stuff to show up from China this is a pretty good connector.
These are the motors I use. You can get
 |
| PopWing 900mm, same as Turnigy TekSumo |
Compared to the Turnigy Tek Sumo/ Tech-One Pop Wing
The Turnigy Tek Sumo/ Tech-One Pop Wing are essentially the same plane. They are a tad bit smaller at 900mm compared to the 1 meter of the Evo 1000 plane. They both have a pre-cut battery compartment which seems to ideally work with many 1500mAh 3S LiPo batteries. And yes, during a nose crash you'll be gluing the nose back together. This is the weakest feature of the Popwing/ Tek Sumo. When the Tek Sumo/Pop Wing is dialed in right, it flies very nicely. It seems to thrive on having a heavy battery near the nose. If you put the wrong battery weight in the plane won't track. Worse yet it can tail spin in poor turns.
The Evo-1000 seems to be balanced better. It doesn't suffer from needing exact battery weights like the Pop Wing. It just feels a lot more stable in the air. When you have it tail heavy it still flies but will wander around a bit more.
 |
| Ripped in half? Nothing a little glue can't fix. |
Testing the "Indescrutability" of the plane.
The plane says "Nearly indestructible" on the box. I, unfortunately, had to push it to its limits.
Oh, the day started off fine. I had a 2200mAh battery that needed to be used up so I attached it to this plane. It's a newer battery which made it lighter than its older counterparts but heavier than my usual 1.5 or 1.8 amp batteries. Despite the extra weight, it flew well. A bit clunky but it was okay.
Then it hit a thermal and went up into the clouds. And then it was gone. I went around the neighborhood for an hour looking for it. I did manage to find it a couple of blocks away in someone's driveway.
The damage- The plane ripped in half, one servo was broken, parts of the foam were missing. But it came home with me, and I've actually fixed worse. I ripped out the fiberglass spars and won't put them in any more planes. My secret combination of glue is UHU Por and Gorilla Glue. The Por bonds tightly and the Gorilla Glue fills in dwells. Then I cut in grooves for 2mm spars both on top and bottom with carbon fiber rods. Yes, the plane isn't as pretty but the flex is gone.
It's back to nearly the same condition it was in before the crash. If anything it's better with the carbon fiber rods adding for stiffness.
How to build the Evo 1000
Since the instructions aren't the best, here's my suggestion how to build it.
Day 1 (5 minutes)
Take around 3 water bottles per wing and weigh the wings down overnight on a flat surface like a kitchen table. Keep the wings out of the sun
 |
| Put bottles on plane overnight to flatten it out. |
Day 2 ( 2 hours)
 |
| Let UHU Por stand for 10-15 minutes, then attach cores |
Take a generous amount of UHU Por and make a bead on each side of the wing's center. Let it dry for around 10 to 15 minutes. Then push the two pieces together. Use long pins to lock the cores solidly together. Keep the plane out of the sun and let it cure for around a day.
Get your electronics together. Make sure the motor and ESC has the proper bullet connectors and the ESC is equipped for the right connector for your battery. Do a nice job with this step so that you don't have it coming apart later or having shorts. Hook up your receiver, bind it to your radio and center your servos. You do not need metal gear servos for this build. The generic 9g servos are fine.
Use wood glue to glue the motor mount together. After it dries for around half an hour I like to use 30-minute epoxy to coat the mount. It makes it very durable but use it sparingly because it will add weight to the tail.
Day 3 (2 hours)
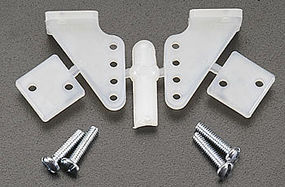 |
| Buy better control horns, it's worh the money. |
There are some parts that come with the kit that are worthless. You'll need better control horns and something like a DuBro's EZ connect for the control arm to mount the 2mm carbon rod. The carbon rod and little connector for the control horns are fine, but use a heat gun instead of a match to secure it. You may need a bit larger piece of heat shrink than what comes with the kit.
It's time to layout your wiring on the plane. Get the servos installed but don't glue them yet. Put the control arm on (making sure it's still centered) and figure out where you would like the control horns. Cut the servo wire routes into the plane.
 |
| This attaches control rods to the servo horns |
Next it's time to install the spars. If you have 2mm carbon fiber rods in 1000mm lengths handy, be sure to use them instead. Don't use larger diameter carbon fiber. 2 or 3mm is fine.
Once that is installed and the servo wires are cut in, you can start gluing. Glue your control horns, your servos, your motor mounts, your carbon fiber rods/ribbons. Last glue in your motor mount. It doesn't matter if it's a bit sticky from the epoxy.
Let everything dry for 24 hours.
Day 4 (2 hours)
Remove the pins you installed on day 2. If the servos are well glued in, install the control rods. Attach the motor to the mount. connect the speed controller and figure out where and how you want it mounted to the plane. You can use zip ties and velcro to hold it in place. I like to keep mine inside the motor mount fins.
The instructions suggest cutting a spot for the battery up front. I DO NOT LIKE THIS IDEA. You need the foam in case of crashes. Instead, buy heavy duty velcro and create a 4" strip from the nose to where the first compartment is located. Using a combination of zip ties and velcro straps you can strap the battery down to the velcro. This is my little secret to the plane, experiment to where the best battery placement is for your plane. Use UHU Por to glue the Velcro to the foam.
At this point you can finish building the plane. Figure how to do Elevon mixing on your radio. If you've never done this before this will take some time. Both ailerons need to go up when you pull back on the stick and down when you push up, left the left aileron needs to go up while the right goes down. Attach the propeller making sure the little numbers on the prop face the direction of flight. Glue your winglets on, use Por and the pins once again using the same technique. Let it all dry overnight. If you leave the pins in you can get away with the winglets not being dry for your first flight. Remove the pins after a few days.
If you're conservative with the build, and you didn't add extra weight to the back, put a 1500mAh 11.1v 3S battery Center it between the nose and the first compartment. Keep your elevons perfectly flat for your first flight. It should fly. You may want to put in 3 clicks of uptrim after your first flight.
You'll like the first plane, so why buy a second one? It's because it won't be long before you figure out a few things here and there you would like to change about the plane. Once you stray from the script, it's not the same plane. So, one is your stock plane, and one is your mod plane.
This plane was designed exceptionally well, it's a steal at the price that it sells at and you're trully will love it!


No comments:
Post a Comment