Wednesday, April 24, 2019

Visualizing RC Radio Range

Signal Hill, Hilltop Park, CA


Two words I love are "useful" and "free."  When I think of things that are useful and free, Google Maps comes to mind.  And yet, there are areas where Google maps aren't so useful.    What if you simply want to map your transmitter's range for your next flight?   In this hypothetical example, we'll look at Hilltop Park in Signal Hill, CA.   What better place to illustrate your transmitter's signal than Signal Hill? If you visit it on the right day in Los Angeles, it's lovely.  You can see all the way to Downtown Los Angeles and out to Long Beach.  The strange thing about the park is that it's only  110m(365') above sea level.  But, it's in the basin of Los Angele which is fairly flat, thus you can get a wonderful panoramic view.   Of course, the first thought that comes to mind is not "This would be an excellent makeout spot" but instead "Hey I want to fly my plane from up here!"  It's a bad idea for a number of reasons, aside from the legality of it the fact that it's densely populated once you leave the park and a crashed plane very easily could create property damage.  But the point remains, what radio system could potentially get you to the waters of Long Beach?

I am going to bring up four popular receivers

Spektrum AS3X-  300m range?


FrSky XM+-1K  range

Image result for xm+


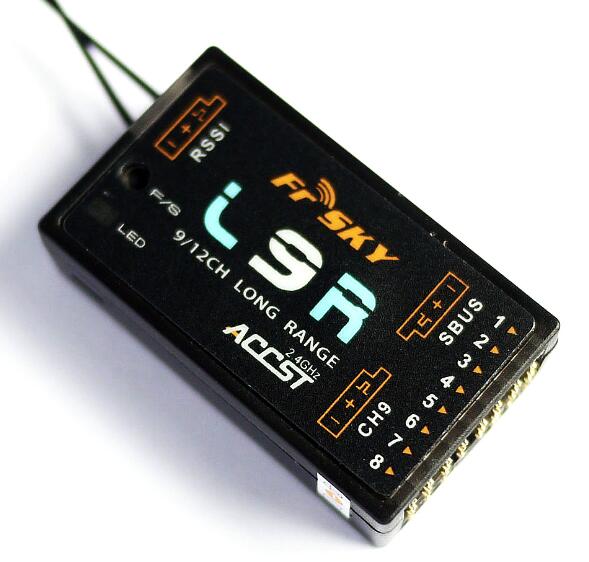
FrSky L9R->3K Range
Image result for l9r


TBSCrossfire-6K+ range

TBS Crossfire Nano Rx

The FrSky is fairly well published.   Spektrum says the AS3X is "Full Range" and doesn't really disclose hard numbers.  Thus, I will trust it for the first 1000 feet.  The TBS Crossfire runs in the 900mHz range and under the right conditions and right tools can go 30K if not more.  6K is perhaps an understatement, or maybe not?  More about radio range later.

One incredible mapping overlay

Here's a link to the map I am about to share.  In it, you'll see four circles.

AS3X


The first circle is the Spektrum receiver's range.  300 meters is around 1000 feet.  The good news is that it will cover the entire area of the park.  The bad news is water is nowhere in site. The AS3X is a Spektrum receiver with flight stabilization built-in. It's really more of a  line-of-sight receiver than one built for FPV.   I'm sure range is further than 1000 feet, but 5 times further?  Unlikely.  There is a Home Depot and Costco just below the park and chances are good that you can still see your plane after it goes out of range. That means that the receiver is fine for park flying but for long range FPV we have to look elsewhere.


AS3X Ramge


XM+


FrSky XM+


The XM+ is an SBus receiver with just one set of pins.  On that one set of pins it puts out  16 channels.  It's tiny and very light.  The advertised range is 1km though others have gone much further under certain conditions.   Low to the ground in busy areas the range can be below 900 meters.


The small circle in the center is the Spektrum AS3X, the larger circle is the XM+.  That's what five times the range looks like.   Impressive but still nowhere near water.  It's great for FPV where you're staying fairly close to where you're standing.  1km is a bit too far to see with most planes thus it's ideal for FPV.  Still, we need more range if we're going to make it Long Beach.


FrSky L9R


It's time to pull out the big guns.  The "LR" in "L9R" stands for "Long Range."  The specs say that the L9R has a range that is greater than 3km.   Cool, but, what is that?   Since they came up with the number 3km that's what we'll use.


L9R
And now, water is on the map for the first time. As you can see the smaller circle is the XM+ and the tiny circle is AS3X.  The water is within sight, and the L9R can do at least 3K, so why not just go for it? Of course, if you lose signal and don't have INAV correctly programmed someone will find a free plane.


TBS Crossfire

One does not merely buy an FrSky radio system.  When you buy the Taranis you're investing in FPV.  Still, if you want to go further there are more options. When you get into OpenTX and INAV what you're essentially doing is using a radio to have one computer negotiate with another computer.  You will not be able to see your plane 1K out and you cannot trust that your video transmitter is going to work flawlessly.  You need a failsafe, which is a computer that will fly your plane back to you should you lose signal in either your radio receiver or video transmitter.  And yet, if you want more range you'll have to move on to newer technology.
TBS Crossfire

The Crossfire by Team Black Sheep is in the 900mhz band.  You don't need a Ham Radio license to fly on this band.  Some people are claiming flights over 30K with the TBS Crossfire.  And now, for the first time, we see that this system can cover a range from Signal Hill out to the Queen Mary and back.  You can see all four circles.  If your plane can achieve a speed of 48K/Hr the total flight would take 15 minutes.

Radio Range-Having a healthy sense of scepticism


We'll be flying at a dry lake in the coming months.  There is nothing around.  No hills, no trees, no buildings, no radio interference to speak of. Just flat, wide open land.  The radio range will be off the charts because there isn't much to interfere with a radio signal.  This map is the polar opposite. Trees, buildings, some small hills, and a solid ton of radio interference, even on 900mhz.

I'm certain that people are getting a solid 1K on the AS3X, while others have advised me that they get 3K from the XM+ and there is a video of the L9R going 14K while people are taking the TBS Crossfire out 30K+. If you can monitor RSSI values while flying it certainly helps.

Here's a video from the park in question. At one point you can see the Home Depot and Costco where he probably would have lost range with his drone.


A more practical application.


One of my buddies has a timeshare in Cab San Lucas.  I've gone with him before and flew planes on the beach, it's a  ton of fun.  At the end of the harbour is Los Arcos, which is famous for its beauty.  The question is, what radio can he use to make it to Los Arcos?



Los Arcos, Cabos San Lucas Mexico


Cabo San Lucas


This is a 1K map and this is about as close as we can walk without having to get a cab ride to the other side of the Marina. This is a 1K radius which means that the circle is 2K  Los Arcos is just outside the 1K radius, but not by much.   Be sure to update your firmware to get RSSI readings.  Be certain that your failsafe settings are legit because you may be using them.


The Golden Gate Bridge


Golden Gate Bridge, San Francisco, CA


Golden Gate Bridge


Drones are banned from flying on or near the Golden Gate Bridge.    But let's imagine they were fine, or you have a wonderful lawyer on retainer.   You can see that the L9R would cover the length of the bridge.  The assumption would be that you would fly from the San Francisco side near the Golden Gate Bridge visitors center.


Lake Minnetonka


In the final example, I am imagining that I will make another trip to the city my wife is from, Minnetonka, MN. And I can talk someone to dropping me off on some desolate part of the lake. Before I even step foot on the ground I can figure out how far I can fly with an XM+ and where to turn around.

Lake Minnetonka

Flight planning


You can use this tool (again, here's the link)  so that you can quickly look at the range of locations you plan to fly.  The tool works in metric and imperial units and you can save a link and  keep it handy so that you can think of flight paths and landmarks to help you keep orientation.   You can do "What if" scenarios and decide if you need to upgrade your receiver.  As you can see from the examples you can view a map or satellite map.


Radio range


It's impossible to say exactly how far your radio will work.   Instead of one factor there are as many as seven factors that have influence over your range.  If you fly low to the ground in an area with a lot of radio traffic the range may be less than what's listed.   If you're flying high in low radio traffic areas it may be considerably more range, perhaps twice to three times the suggested range.     If you have a receiver with RSSI that will help alert you when your receiver reception is critical.  Of course, all of this is based on the notion that your VTX will work further than your RX which is often not the case.  With this tool, you can also start mapping the range where your VTX has fallout.


One huge benefit


It's easy to lose orientation easily when flying.  With a GPS and INAV configured you'll always know where home is.   But, I wouldn't rely only on that.   Looking at the coverage circle on a map you can get a sense of where you're likely to fall out of range. You can look for landmarks in the area so that you know how far you can comfortably venture out to and where you should start turning back.  You can even make a second circle that is 80% the size of the main circle,. You can visualize where you can make your turns.  Look for recognizable landmarks from the air to help you know where to turn and how to get back.



Friday, April 19, 2019

Why your plane loses altitude in angle mode


The mystery


I wanted to know some simple truths in life, such as who built the pyramids,  why hasn't the United States converted to the metric system, will the Smiths ever make another studio album and why did Nikki Miller turn me down for the prom?

Some things in life are too complex to grasp.  But, looking at my broken C1 Chaser on the ground perhaps there were a few things I could still learn?  In the angle mode it kept dropping, and  I had it too close to the ground,  directly overhead and lost perspective.  Not the smooth INAV experience I was hoping for.

So, as the glue was drying, yet again for this version of the plane I asked the smartest people I know, who happened to be on the INAV Fixed Wing Group what happened. Someone wrote in a nice reply that answered the question.

Image result for level flight

Level vs altitude

A perfectly level plane won't lose altitude, right?   Or perhaps a better question is, what do you want?  Do you want your plane to fly perfectly level or do you not want to lose altitude? Because a  level flight usually is a flight that drops.  When we first set up our flight controllers what we're asking is for the plane to fly perfectly level.    And my flight controller was performing perfectly.

But, planes aren't exactly perfect, and they don't fly exactly efficiently. It has to do with the way that the air travels across the wing.  The tendency is that at level flight many planes will sink.  But, it really depends on the airfoil.  Some planes are designed with a bit of reflex built in.   But, most just sink when level.


2.5 is my magic number


To combat the loss of altitude we have to pitch the nose up ever so slightly to compensate.  One of the first things I do when I get a new flight controller before I even begin soldering is to flash INAV.  When it's flashed one of the very first steps is a calibration.  I will teach the flight controller what the six axes are in my world.   I find it best to do this on a desk and hold the flight controller perfectly still for each reading.  I find that these are the six truths that the flight controller must learn.   But, shouldn't you do this in a plane instead?  It's like having a compass (not the same, but similar) that you mount in your car.  If you mount it on your windshield at an angle, do you need to recalibrate your compass?  No, because it will always know where north is, no matter how it's mounted. 

My view is that straight up and straight down really aren't open for interpretation. Neither are the other 4 axes.  The position of the flight controller may change, however.  That's what we have to account for. When your flight controller has learned it's six truths it can make accommodations for its environment.  You can mount it upside down, 90 degrees left or right yaw, or even 180 degrees.  But we have to tell the flight controller that it's not mounted exactly as expected. 

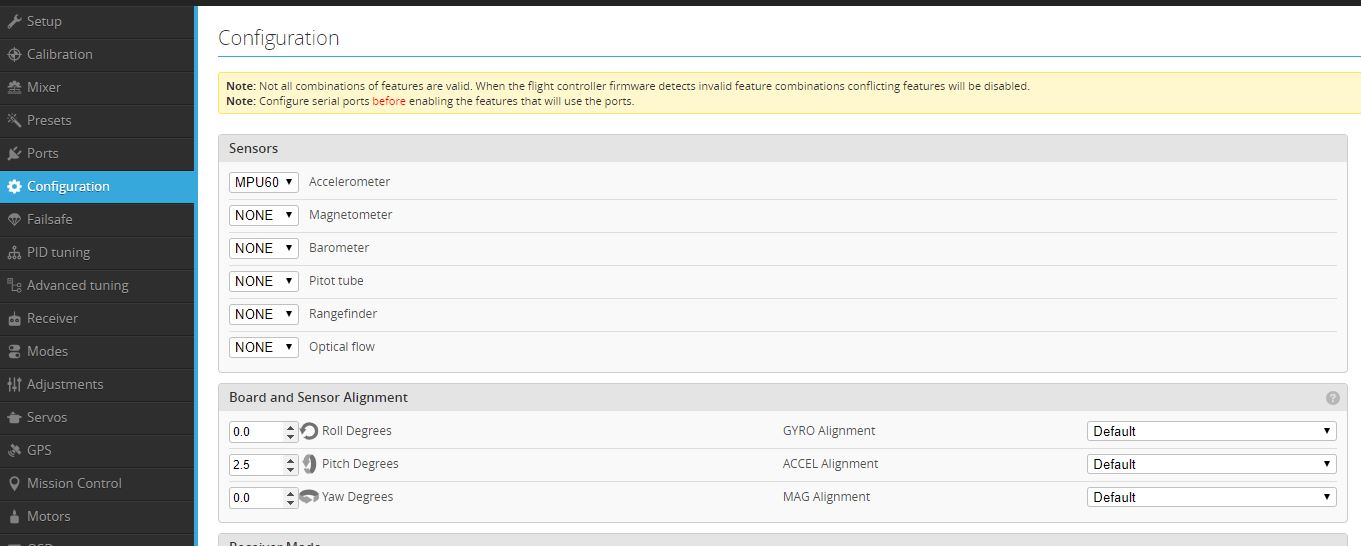
In the INAV Configurator, in the configuration tab on the top left, there are boxes where we tell the flight controller how it's mounted. This is where you can account for it being 90 or 180 degrees off yaw or upside down (180 degrees pitch).  If I am not making any other pitch adjustments I change the number to  2.5 (positive). That doesn't automatically fix everything, but it's a very good place to start.  If the plane still sinks in normal flight I can take it up a half a degree at a time.  If the nose is up too high it will gain altitude too easily and may seem like the control surfaces have even less authority. 

To answer a question people will have, yes, most of the time it works fine, or well enough to allow me to perform an autotune.

 I don't want people reading this and thinking "I don't want to lose altitude and crash, why not give it 5, 10 or 15 instead?"   If you want a real-world example while this isn't such a good idea, get on your bicycle and ride an 8% grade.   8% is a small number, right?   You'll be huffing and puffing and grunting all the way up the hill.  I have one near my home that's over 2km long  By the time I'm at the top I can see the valley below,. The valley is where I start out at before the 8% climb. Little numbers make a big difference.


Play with it.


If the plane is still sinking, a bit, take the number up to 3.   If it's not sinking but you're concerned about lift or authority over the control surfaces, drop it down to 2.   If it's too off for your tastes, land the plane and don't fly it again until adjustments are made.

There is no right number for every plane. So, experiment, and be choosy about what works for you.   I find that 2.5 helps get me to the point where I can autotune the plane.  Every time you change this pitch number in the configurator you will need to do a new autotune and possibly an auto trim of the plane.

We'll be working on a master-tune document, but I wanted to get this out there right away.

I will give you some other clues as well.

Your plane really should fly well in manual. If it doesn't and you're not up to snuff on tuning skills you need to ask for help.    You have to fight to get the CG right and the control surfaces working to keep the plane in the air.   And if you can get a gr a good eat flying experience with your plane in manual the rest will fall into place. 

If your plane flies well in manual but not well in stabilized modes you should perform an autotune.  Hold onto your hat because for a short period of time the plane will fly even worse.  Then it will fly much better over time and you will really like the results.  Be sure to save.

If you are in the stabilized modes and you have no authority to speak of you are most likely  tail heavy.   A quick way to tell is to put the plane in manual, get it up high and point the nose at the ground.  If  the nose balloons back up with speed you are  tail heavy. 

Fine tuning is an art in INAV.  Be very picky about what you like and work on improving your plane for a good experience. 

Sunday, March 24, 2019

Popwing/Teksumo Source List


A little story, but first. . .

I'm going to include links in this story.  They are not affiliate links. I make no money off of any of your purchases.  Also, feel free to get what you want.  The 2205 2250KV comes in many different flavors.


Meet Mack


Mack is a member of the INAV Fixed Wing Group.  He lives close by and finished a build on this lovely Flite Test Spear.  I took it up and gave him the controls.   It has a 9" prop with a decent motor and two 4S batteries running in parallel.    I was trying to fly it at the park behind him, I had it on minimal power which was around 20% throttle.

Oh my, this is a wonderful plane!  He had it set up nearly perfectly.  It flew better in manual than with INAV stabilization.  That's because it hasn't been trimmed or tuned in INAV.

My thought of the plane is that this is a perfect midrange cruiser. It has a lot of power.  You can certainly use it to test the range on your radio system.   But a park flyer it's not.  It's a bit too much for a first plane.

Then I put Mack on my Popwing.


My plan was simple, I got it up to 200 feet and put on "Angle Mode" in INAV.   After a minute I was walking away from him to get my camera.   The adrenaline rush, heart pounding was gone.  This was a plane he was in control of and it was fine.  There was no need for me to grab the radio back from him.  He was just enjoying the flight and wanted the same plane.  This is a good plane to not only start off with, but it's a good plane if you just want to go out for an early morning flight.

This got a little fuzzy at the end.  You can tell it flies well.


Parts list


Feel free to change what you want.


Teksumo or Popwing 900mm


My motto is to buy from wherever you can find it for the least amount of money.  The Teksumo comes in different colors now.  I do like their upgraded motor mount as compared to the Popwing.

Motor 2205 2350 KV


This is what I have on one of my planes.  It weighs around 30g.  Thus it doesn't need as much weight up front.  It makes for a very light build.

The motor comes in many different flavors.  I also like this one.

EMAX Version


Servo MG90s

Seriously, you'll need a dozen of these on hand at any given moment if you're into this hobby.


Plush 30 ESC


You'll need an ESC with a linear BEC built in.  Don't underspend on this.  The yellow ones on Banggood for $5 are garbage.  I've had good luck with  the Plush and the Skywalker


RX Receiver  (XM+)


Obviously, you'll need one for your radio system.  For us Taranis guys, here's one that will work with the flight controller

BN-220


It's small, light, cheap, is current, and works great.  It also plugs into the flight controller


SP Racing F3 Flight Controller

Yes, INAV works on it up to version 2.1  There is no OSD. It's about the easiest thing to setup in INAV.   With that being said you still have your hands full.  More about this flight controller in the links below.


UHU Por-Foam Glue

Don't just buy one tube.


E6000


Put it on the leading edge of the wing.


5x4 Prop

Whatever bullnose or APC style prop you can find.


All together, I figure this plane is around $120 US.


Links to other documents-


INAV Resource List


Three good ‘First-build’ INAV planes-  Before you can take on your Skyhunter with ground station you’ll want a good first plane to learn on.  Following the progress of a lot of our members we suggest the Reptile S800, The Sonicmodels AR (900mm) / RMRC Recruit as good first builds.  S800 is a great build if you’re coming to us from quads. It uses a lot of quad parts and is perfect for people who have built quads. The AR/Recruit is perhaps the most beloved newbie fixed wing that you will never outgrow.  The third plane is for Line-of-Sight pilots who come to us with limited electrical skills. You probably have a Popwing/Teksumo sitting around. For as little as $25 (US) we can get it flying with INAV. This is by far the most simple INAV setup we can think of.
Article about my Popwing build and maiden

Article about the Seriously Pro F3

INAV Resource List


Wednesday, March 20, 2019

What to do with your old Teksumo/Popwing


Old Popwing has seen better days, but now I'm in love again!


"Wow" a young boy screamed as my Popwing took off like a bat out of hell from the local park.  Though he was impressed, I certainly wasn't.  After nearly crashing into the ground the plane shot up to around 40 feet.  "Too much up-trim," I thought to myself.  I landed it, and moved the control surfaces down even closer to level and shot it off again, This time with less throttle. A nice toss and the plane was performing well.   I set some radio trim and figured out what was off.  The control surfaces were a bit too flat, after landing I brought the control surfaces up slightly.  My third takeoff was fine. The plane was flying well.  There was no trim, no expo, and I was at full rates. "She's ready," I said with a smile.  I enjoyed the rest of the flight as I thought about what I was going to do with her that night. 

Later on that night.

I cut the zip tie that held the receiver.    Though it wasn't a bad receiver it wasn't what I needed. I spent around 20 minutes getting my  SeroiuslyPro Racing F3 flight controller ready.   By now I've been through the INAV setup enough times to have it down cold.    Still, I put a sick amount of modes on my FrSky receiver and it took another 20 minutes o get them all turned on.  The old receiver came out  easy enough (it was held down with Hook & Loop and a zip tie on the bottom of the plane in the cutout compartment0.   The SPRacing F3 has a nifty case, and with a little hook and loop it took roughly the same spot, with one small problem, Since it was on the bottom of the plane it was upside down.  This means the plane will think left is right and right is left.   In the configuration tab in INAV I simply changed YAW by 180 degrees and that solved the problem.  I used E6000 to glue down the XM+ receiver to the bottom of the wing. It's tiny.  The only real mod was to take a very small drillbit and hand drill a small hole from the compartment my flight controller and ESC were located. I passed up one tiny cable.  It went to my GPS unit. The GPS unit needs to be on the top of the wing so that it can see the satellites.

Here's the wiring, in detail.

#1. Plug in ESC into the flight controller  (S1)
#2. Plug in GPS Unit into flight controller (plug on side of controller)
#3. Pug in servos into the flight controller (S3 & S4)
#4. Plug in the receiver (one cable) into the flight controller. (special cable that comes with the flight controller, plugs in side of controller)

If you're counting, that's five plugs to plug in, that's it!   It truly is that simple.

Aside from the rat's nest of wires the F3 fit right in

The re-maiden flight

It was a day with rain in the forecast. For the record, Southern California, a place where it never rains has seen 3 months of on and off rain, mostly on.  I had my shoring up flight the day before, and now, at face value, it was time for its INAV maiden.  Would the proper trim from another receiver transfer over to INAV using the FRSky transmitter and recevier?  Would the flight controller have its own ideas as to what was servo-center?  I guess we'll find out!

With a good toss the plane was off and flying.  It was a tad tail heavy so I landed it and moved the battery forward.  This time all was well.  She was off and flying pure and smooth. It was so nice that I hesitated to do what I had to do next, turn on stabilization.  The key to doing this is to fly it over grass because it may come in for an abrupt landing.   With a flip of a switch "aaah, even nicer!"


There was good, and then there's even bettter.  I was seeking as close to perfection as I could get with this plane.  It had a lackluster motor on it which made it fine for a floater, but it certainly didn't fly fast.  The best thing I could do was to make this a smooth flyer.


What a flight controller can and can't do

If a perfect plane flight is 100% and your plane is at 60% of it's potential the flight controller really won't help get you to 100%.  Maybe 70%, if you're lucky.  I used to be happier with planes that have marginal flight characteristics, but not anymore.  If I can get a plane to 90% the flight controller will help round out the flying experience, bringing the plane closer to 100%.  The point is to use the flight controller to make a good plane better than to make a bad plane fly well. 

Servo Autotrim

When we get a new plane we tend  set it up as best as possible and then take it out for the first flight.  When the plane is in the air we discover it's still not right and then set the trim in the radio.  What the trim setting in the radio is doing is permanently make small adjustments to the control surface positions by compensating in the radio.   The transmitter is a low-level computer that keeps track of these settings.   What is different is that with a flight controller, the computer is moved to the plane.   Thus the transmitter defers most of its decision making to the plane's computer because it's a better computer.   But along with great power comes great responsibility.    It's a bit more work to set up the flight controller and refine flight characteristics.  Thankfully, INAV helps out with this task.

This may sound counter-intuitive but the way a lot of planes are designed, level flight actually causes the plane to pitch down a bit.  Thus, there needs to be a certain amount of up-trim added to prevent the plane from losing altitude.    We tend to do this when we first fly a plane, we'll give the plane some uptrim with our radio trim buttons.   Part of my exercise from the day before was that I found what I felt was the very best setup of the plane. I set trim, then when the plane was landed I set the control surfaces to where the radio was trimmed. Then I set the radio trim back to zero.  It took three flights and it was close to perfect.  My servos arms are at exactly 90 degrees from the plane. Everything was ready.  So, why do I have to go through trimming a plane if the plane flies well in manual?

Flight stabilization can make things worse, at first.

The plane flew great in manual mode, which meant that I had total control of the plane's control surfaces. When I switched into one of the gyro-stabilized modes the plane did the best job it possibly could.  But, perhaps the flight controller isn't exactly pointing straight, and sometimes the flight controller isn't exactly situated at the center of gravity.  And when these things occur, sometimes you make things worse when you attempt to fly in a flight stabilized mode.  A lot of people get to a point in INAV where they give up right about here. They just fly in manual and use the features they like and forget about the flight stabilized modes.  They are missing the best part!  Getting this sorted out isn't difficult, and with INAV 2.1 complex PIF settings are calculated for us using the Auto Trim feature.


Refinement

I calibrated the gyro before putting it into the plane.  And the plane is certainly setup right, so what more do I need to do?   If I like to only fly in manual, the plane is ready. But, just like when you get into a new car for the first time, you have to adjust the mirrors, the seat, the heater or air conditioning.  The car works fine, and you know how to drive, but still, modifications are needed,  you just need to get it set for your situation.  This exactly what needs to happen with a new flight controller in a plane.  It has to make minor refinements.   INAV has a simple way of doing this. You have to teach the plane what stabilized flight looks like.

Turning on Servo Auto Trim.

I took the plane out, I got it flying level, and then I turned on the Servo Auto Trim and flew level for at least a few seconds.  What was happening in these few seconds was the plane was learning what level flight looks like and then made adjustments.  I then landed the plane, disarmed the flight controller, and shut off the Servo Auto Trim.   Then I took off again.  It was a bit windy the first time I did it. It worked okay.  The second time I did it there was no wind, and that time I really got it.  The plane flew great in the stabilized modes.


Turning on Auto Tune

The problem I had with this build was with the weather.  We had an extended rainy season and the days I could fly were often cold with an unstable atmosphere. One morning I had the most perfect flying day.  Light, fluffy air, a mild breeze,  it was nice and warm. In my haste to get things started I couldn't find my 1800mAh 3S battery.  I instead went with the slightly lighter 1500mAh 3S .  The plane flew without a problem.  I got it up a couple of hundred feet in the manual flight mode and flipped on the horizon mode. It flew great, so I went for it.  I turned on "Auto tune" and started flying. I kept flying in this mode for around 3 minutes.   I noticed that I was at exactly half throttle.   I needed a comfortable flying speed and for this  lackluster motor half throttle was perfect!   What is important is that Auto Tune needs to be set at a speed I will most often fly in, and for me this was perfect.   Before I landed I turned off auto trim, then I l anded and saved the configurations.   Then I disarmed.  I armed again and took the plane up and did yet another servo auto trim.     By the time I was done I was thrilled with the way this plane flew.

So, what's it like?

How did it fly?  I've never had a Popwing fly this good! I had things trimmed at half throttle and the plane was Floaty McFloater.   I flew the plane I didn't have to manage the flight. I hit the sticks when I needed to turn, but that was about it.   It was like driving on a freshly paved road.   When it was power off time, it was a nice, smooth stable landing. I did notice that the wind had picked up during the course of my flight.  I just never felt it.  I didn't feel like the entire experinece made things worse or took away the thrill of flying.  About the only major adjustment, I had to make was waiting 30 seconds for my plane to find satellites and be ready to arm the first time I plugged in the batttery . If I were to change batteries and do another flight the satellites will be found much faster if I can swap the batteries in less than a minute.

Horizon Mode

This is a good, comfortable mode for flying.   I find it to be the mode the balances the need for stabilized flight with the need to be hands-on during the flight.   This certainly smooths the ride while allowing you the ability to feel in control.  I was getting the plane flying straight as an arrow, and was using minor fluctuations in throttle to raise or lower elevation.  Powering off the plane had a lovely glide back down.  Part of this was the legenary flight characterisits of the Popwing/Teksumo.  But mostly it was the flight controller making minor adjustments during flight on an ongoing basis.

Angle Mode
My experiences with Angle Mode thus far haven't been good.  If your plane isn't well trimed and then autotuned and auto trimmed this mode will seize control of your plane and fly it very poorly.  You will be out of this mode in short order.

But, when your plane is well trimmed this isn't a bad mode.  Yes it does have limited banking angles and thus you need to account for that fact.   But it wasn't horrific. It was actually quite pleasant.  With this mode I would have no problem handing over the radio to the newest of newbies. They can get the feel of the plane and hopefully can lsiten to your input while figuring out how to keep the plane moving in the right direction and not crashing.

If anything, this mode is too smooth.  When my buddy Cabo-Charlie invites me to Cabo San Lucas again, this is the mode we'll be flying in while drinking Coronas on the beach in our highback chairs.


Success! 

The point that shouldn't be lost was that this wasn't a plane that I planned to have  flying with a flight controller.  Yes, it does help that I knew my way around in INAV  but the point is that planes which may not be good candidates for INAV FPV may actually be good candidates for INAV LOS.   The reason I felt a bit compelled to write this is because a lot of people are cheering on the demise of the F3 flight controller in INAV.   But here's a perfect example of an application where an F3 flight controller does work.  If you can solder 24 pins, or if you have a friend who can solder 24 pins for you here's a cheap and easy way to get started with INAV.


Not everybody gets line-of-sight pilots

Instead of staring at a screen, or looking into goggles we're staring at the sky.  There's something majestic about watching your plane float around in the sky.  Not every plane needs a camera and video transmitter. With a flight controller, this doesn't need to change.  Yes, I do have other full FPV rigs that fly.  But there was a specific reason why I was interested in modding this plane.

Fugly but flies well


This is my test plane

This Popwing certainly isn't new.  It has it's battle scars.  It's been in a few crashes but the largest problem is that it's seen a lot of use.  Too many landings on tall grass have cut into the foam on the bottom and the edges.  I have a few beloved planes like this.  This is actually the perfect plane for INAV.   There are many settings and wonderful modes to try out.  The problem is, you really shouldn't be using your top shelf planes as your INAV test plane.  The beauty of INAV is experimenting with new things.  For this, you'll need a test plane.  Something that is light and cheap.  What better than a Teksumo or Popwing?


The entire setup was under $25 US. 

The SP Racing F3 flight controller was $13 and the GPS unit was $9.  Together, with shippiing, it's under $25 from Banggood. The more modern F722-Wing costs closer to $60 and isn't plug and play. Yes, it does a lot more and is better in every metric to the F3 flight controllers  The F3 Flight controller is cheap and is a simple entry into the world of INAV.    It runs the vast majority of the flight modes that are offered by INAV.  This is a cheap, fast and easy way to get into computer controlled flight.


The things you need to know before jumping in.


The F3 will only support up to INAV 2.1   As of March of 2019 the programmers at INAV have decided that all future releases of INAV will not be offered to those using F3 flight controllers.  Since the F3 represents older technology hardware they wish to continue their efforts with newer technology that is a bit more robust amonts of memory.

You will be able to download INAV 2.1 for the F3 flight controller for some time to follow
.   Thus, if you need to reload INAV onto your flight controller, you'll be able to download it.

The F3 flight controller doesn't come with an OSD-  One of the cool aspects of INAV is the on-screen display that you use in conjunction with a camera and video transmitter. You can add an OSD to the F3, but it does require wiring and programming.  If this is the route you are going it's better to buy an F4/F7 board with an OSD built in.


You will need to solder 24 pins-  If you've never soldered before this is a great way to learn.  If you blow it, you're not out as much money as one of the more capable boards.  If you can't solder, you'll need to have someone help you.

The SPRacing F3 is a clone-  The original F3 racing isn't made anymore. I have speculated that the F3 clone is actually a better board because it may use newer hardware.  I have a few of them, they work fine.   But, your results may be different.    Clones always have a degree of uncertainty.


You may need a new radio and receiver- The flight controller needs switches and knobs to work.  You use the switches to work with the different modes.  Most traditional radios have somewhere between 4 and 8 channels. Each channel needs a servo wire hooked up to it. That means, if you want to work with 8 channels, you'll need 8 wires coming from your receiver.    The newer style of radios are serial based.  There is only one cable the receiver needs to offer the flight controller. Your servos and  ESC plug into the flight controller.   The wiring is much easier.  On that one wire upwards of 16 channels can be used!  You will need to check and see if your radio system is serial based.   Some are and some aren't.  The very inexpensive Flysky FS-i6 and Turnigy TGY-i6 are both serial based transmitters  Some of the receivers are and some aren't.


You will have to challenge yourself to take on a learning curve-  Knowing how to build a plane and getting it flying is step one.    You will have to do some computer work to get the flight controller ready.  You don't have to have an electrical engineering degree to take on INAV, but just the same, you won't figure this out in one evening.  This has to be something you want to do and you will have to apply yourself.

INAV Fixed Wing Group on Facebook

We've created a group on Facebook that now has over 1000 members within the first few months. Our group is made up of pilots from every continent and nearly every corner of the globe.  Our members have come up with a setup guide for INAV as well as video tutorials.  Since we found people with the same issues over and over again we came up with a troubleshooting guide for INAV. Though you may not live near any of our members you will get the support of the community.  Thus, if you decide to take on INAV you're certainly not alone.  You can get help.


If you build and tinker with planes, you'll love INAV.

The people who like prepackaged planes (PNP) may not enjoy INAV as much as those of us who like to build.  The sense of accomplishment is hard to describe. The first time you throw a switch and watch your plane turn around and fly itself back to you is mind-boggling. The first time you launch a plane and it flies itself to a certain altitude is mesmerizing.  As our member, the famous Australian RC plane reviewer Andrew Newton once said of the auto-launch features "It never gets old!"


Overall

It's time to dust off your Popwing/ Teksumo.  Even in today's world, the F3 board on the this plane is such a no-brainer.    Once installed, you'll be taking your plane flying a lot more.  If you're a line of sight pilot and have this plane it's nearly crazy not to put this flight controller on you plane.   You will love it that much more!  From this board you can move on to other planes.  The learning curve you go through with the F3 flight controller will help you with the vast majority of  INAV builds.


Saturday, February 2, 2019

Eachine Black Wing 680mm Wingspan EPP FPV Racer RC Airplane KIT

Image result for eachine black Wing


When the names of some first builds come along, the Eachine Black Wing hardly gets an honorable mention,  The main issue is the size of the plane.  It's under 700mm so it falls into the realm of a small build.   Planes under 800mm are hard to get excited about.  There is a lot to choose from and most aren't all that special.    When this plane came out I built it with linear ESCs and all the usual things that  I would use on planes twice this size.  The motor was small enough for the plane, or so I thought.  In reality, it was over-powered and never flew that great.   This time, I'm keeping it light and simple.  So, why am I building it again when I wasn't in love with it the first time.  Simple, I accidentally bought two!

When this plane came out a couple of years ago there was a lot of excitement, and then the excitement died down.   I am thinking that thanks to the miniaturization of the radios, GPS, motor, VTX and camera this plane may be worth one more look.   Perhaps a nice, smooth INAV experience could breathe some new life into this plane.


The good


Made for FPV-   Though it's a small plane, the plane is designed for not only an FPV camera but a Runcam on the lid as well.   It makes good use of the space.

Large fuselage -  The fuselage is huge for such a small plane.  You can get an F405-Wing board in it, though I don't know why you'd want to do that!   My goal is to make a minimalistic build so that it's light.   The GPS,  and receiver will sit out on the wing.   I have very small VTX's that can mount in the lid.  I doubt space will be an issue.

Smooth, yet strong molded EPP foam-  I've tried my hand at killing the first build of this plane, and yet, crash after crash she's still fine.  This is a good plane for less than gentle landings.  The smooth EPP foam can withstand abuse.


Low Price-  The plane can be had for under $40, sometimes much less.  The puts it in the price range of the foam board plane kits you'll often find online.  It's not EPO, but EPP which makes it an unheard of deal.

Quad Parts-  Other than servos, most of the electronics could be sourced from quad parts including the ESC, receiver, cameras, and motor.  You could literally make this build from a crashed quad.

Fast & Fun- If you want to, you can put a motor in it that handles 4S so that you can open it up.


The bad


Image result for eachine black Wing
This is how they suggest you mount the motor-Nope!
What I did instead.


Very Loud
- It's a bit annoying how loud this plane can be.  I am moving the motor back and using a smaller prop this time around.

Doesn't like weight-  Don't get too crazy loading this plane up with heavy gear.  It doesn't care for that.  Keep her light.

Winglets are large and glued on.  They do fall off from time to time.  Do a very nice job gluing them on and check them often.

Small footprint-   The odd size of the plane makes for some strange aerodynamics.  It's not a glider. The short fuselage makes for some rather interesting CG challenges, and it's very easy to set up wrong.  Small planes can be a bit wonky to fly.  You would think that larger planes would be harder.  No, the small ones are much harder.

Disappears in the sky rather quickly-  Being small and black means that it's too simple to lose in the sky if you fly it line-of-site. If you're going to pass on the decals, consider putting fluorescent bright duct tape on the leading edge.


The plan


The All Up Weight

Plane::      170g
Battery:    150g
Motor         30g
FPV gear:  70g

Total       420g


The AUW will be between 400-450g

Motor-The EMAX MT2204 2200KV has 440g of thrust.  It should be plenty for this plane.  It will fly nice,  but it won't be a sports plane.   Someone did a thrust test on this motor and found that a 5040 triple blade pushed the motor to 500g of thrust pushing 11amps.  and a meager 133 watts.  Yes, there are plenty of quad motors that can push twice as much thrust on 4S, why not just use one of them?  It's all a trade-off.  More thrust means more power  What I like about this motor is that it's efficient which means that it can hopefully have longer flight times.   It's also a motor I happen to have on hand.

Motors are a personal choice,   The motor used will help determine the flight experience. This comes along with experience in building RC planes.   The one point that gets lost is that the weight of the motor also has a huge impact on the total flight experience.   The CG of this plane fairly close to the motor, which is common.  This means that the heavier your motor selection the more weight you'll need up front to counterbalance the weight of the motor.  Though that means larger batteries that can help the plane fly longer it also means you'll be flying a heavier plane.  You'll need to have more speed to maintain flight and you run the risk of dropping a wing on your turns.  I don't like the feel of a heavy plane.   This can make or break how much you enjoy the plane.

Metal Gear MG90 Servos-  There's really not a point to install plastic gear servos anymore. The MG90s have metal gear but  are not digital servos. Smaller wings get tossed around in open sky a bit more than larger wings.  Flight stabilization can help, but only so much.  No matter what you put on the wing the smaller wings get tossed around a bit in the sky.  Thus, I am sticking with the analog servos and accepting the occasional bumpy flight.


The ESC

The speed controller will be a skywalker 15a ESC.  Why? Because I have quite a few of them that I purchased and haven't used. It's a bit larger than an opto speed controller, but not much.  It's also  has 5 volts from its bec that I really don't need.  This is a small plane with a minimal power draw from the motor. The 5v from the BEC on the flight controller is more than enough.   But, it's nice to have more power if needed.
You really need to hack into the foam to get this Eachine camera to fit.


The Camera & VTX-  I am using a cheap Eachine 600ttl camera and Eachine VTX.  The VTX is 600mw. The camera needed to be carved into the foam on the nose though it was from Eachine as well.

The flight controller


Built, just waiting for the Flight controller. 


And this is where the story ends for now.  The flight controller of choice, the Omnibus F4 Pro V3 clone is sitting in a sorting facility in China. And that's the true beauty of buying from China, learning patience.     The good news is that all the glue joints should be dried to perfection before my first maiden a month from now.   The postal issues may have something to do with Chinese New Years.
I will work on it some more, getting it ready for the flight controller


In the meantime

Banggood seems to be throwing this plane on sale a lot lately.  Prices are often around $32 (US).  After building this plane again, the right way this time,  I do like it.  I do like the S800 better because it glides better. Still, the best plane is the AR 900 in my book.  It's hard to find a plane that flies well under 800mm.   If you buy this, don't go all out throwing an F405-Wing into it.   This may be a good little plane to make from spare parts you have laying around.


So, if you do order it, in the meantime follow the build instructions from Matt


Specs


Plane
Model Number: Eachine Black Wing 680mm Wingspan EPP FPV Racer RC Airplane KIT
Type of plane: Wing (Delta Wing)
Material: Molded EPP
Wingspan:680mm
All up weight (AUW): Unknown as of now
Website link (for purchase): https://www.banggood.com/Eachine-Black-Wing-680mm-Wingspan-EPP-FPV-Racer-RC-Airplane-KIT-p-1176721.html?rmmds=search&cur_warehouse=CN
Notes:  This plane goes on sale quite a bit, liked but not beloved, this is my second build and is WIP.  I am waiting on a flight controller

Motor
Model number: MT2204
KV: 2300
Grams of thrust:  440-500
Battery range it accepts (S): 2-3S
Website link (for purchase): https://www.banggood.com/Emax-MT2204-2300KV-Brushless-Motor-For-QAV-250-p-946400.html?rmmds=search&ID=49006&cur_warehouse=CN
Maximum amps: 11.5
Weight: 25g
Notes:  Not an exciting motor by any means. It has enough thrust to fly. I am hoping the low wattage will keep it airborne longer.  This isn’t the best motor for the plane, it was old inventory I had on hand.  It can be found by other manufacturers.  Most people will use the 2205 instead.

Flight Controller:
Model number: F4 Pro V3
Website link (for purchase):  https://www.aliexpress.com/item/Betaflight-Omnibus-STM32F4-F4-Pro-V3-Flight-Controller-Built-in-OSD/32957382703.html?spm=a2g0s.9042311.0.0.6a664c4dp2Jg0z
Notes: I believe a lot of the boards for sale on Banggood and Ali Express are knock-offs of the originals.   It has good reviews, we’ll see how it does.  It’s  currently stuck in a sorting facility in China, during  Chinese New Year.  The plane is built, but I’m waiting on this FC.

Video Transmitter (VTX)Model Number: Eachine TS5828L Micro 5.8G 600mW 40CH Mini FPV Transmitter
Voltage Range:7v-27v
Mw range: 600mw
Weight: 16g
Smart Audio: No
5v output for camera?  No
Website link (for purchase): https://www.banggood.com/TS5828L-Micro-5_8G-600mW-40CH-Mini-FPV-Transmitter-with-Digital-Display-p-1058136.html?rmmds=search&cur_warehouse=CN
Notes:  There are newer VTX’s out that may be better for this plane. Again, this is what I had on hand. It’s small so it will fit on the lid nicely.   Uses an RP-SMA antenna.

FPV Camera
Model Number:  Eachine 1000TVLMini FPV Camera NTSC PAL Switchable
Voltage Range 5-20V
Sensor: size and CMOS/CCD?: 1/3 CCD
Lens mm  2.8mm
Field of View:  110 Degree Wide
Television Lines (TVL):  1000TLV
Weight: 10g
Website link (for purchase):  https://www.banggood.com/Eachine-1000TVL-13-CCD-110-Degree-2_8mm-Lens-Mini-FPV-Camera-NTSC-PAL-Switchable-p-1053340.html?rmmds=search&cur_warehouse=CN
Notes: This is a fairly good quality for a cheap camera. 1000 television lines.   Though it’s an Eachine and the plane is an Eachchine, it took about 20 minutes to carve out the foam on the nose to make this fit. 

GPS
Model Number:  Dual BN-220 GPS GLONASS Antenna Module TTL Level PAL Switchable
Weight: 5.3g
Website link (for purchase):  https://www.banggood.com/Dual-BN-220-GPS-GLONASS-Antenna-Module-TTL-Level-RC-Drone-Airplane-p-1208588.html?rmmds=search&cur_warehouse=CN
Notes: Beloved, cheap GPS

Servos:
Model number MG90S Metal Gear RC Micro Servo
Quantity 2
Metal or plastic gear: Metal
Digital or analog: Analog
Website link (for purchase): https://www.banggood.com/6X-Towerpro-MG90S-Metal-Gear-RC-Micro-Servo-p-1072260.html?rmmds=search&cur_warehouse=CN
Notes:  Why even bother with plastic servos anymore?   The small size of the plane means it may get tossed around a bit Digital servos won’t help that much.

Speed Controller (ESC)
Model number:  Skywalker 15a  SKU: 30205150
BEC included?: Yes, 2 amp, 5 volt linear
Quantity ( 1 or 2): 1
Maximum Amps 20 (short term)
Website link (for purchase): https://www.hobbywingdirect.com/products/skywalker-esc-15a?variant=3471190980
Notes: Not what I would normally use for this plane, but I am using up what I have laying around (where have you heard that before?).  The +5v and ground have been cut  and may be used for something else

Power Distribution Board (PDB)
Model Number:  (Not needed, the FC has a built in BEC)
How many S?:
Website link (for purchase):
Notes:

Propeller
Model Number  Kingkong / LDARC 5040 5x4x3 3-Blade
Size & number of blades: 5x4 triple bladed propeller
Website link (for purchase): https://www.banggood.com/10-Pairs-Kingkong-5040-5x4x3-3-Blade-Single-Color-CW-CCW-Propellers-for-FPV-Racer-p-1067875.html?rmmds=search&ID=224&cur_warehouse=CN
Notes:  These propellers tend to be nearly commodities thanks to our drone friends.  The measurement at full throttle was 500g of thrust with a propeller like this.   The idea is to not use a 6” propeller to help keep the noise down. These propellers tend to sound like hair dryers when flying.

Battery
Model Number  Turnigy 1500mAh 3S 20C Lipo Pack
mAh::1500
# of cells: 3
Weight: 128
Website link (for purchase): https://hobbyking.com/en_us/turnigy-1500mah-3s-20c-lipo-pack.html
Notes: For this plane, you want to use shorter, more stubby batteries so that the weight is more concentrated in one area. You will need to move it up and down the fuselage to find the right CG. 


Wednesday, January 16, 2019

Sonicmodell HD Wing Review-Underrated FPV Platform

Overview


Image result for sonicmodell hd
From the sales description found on websites:

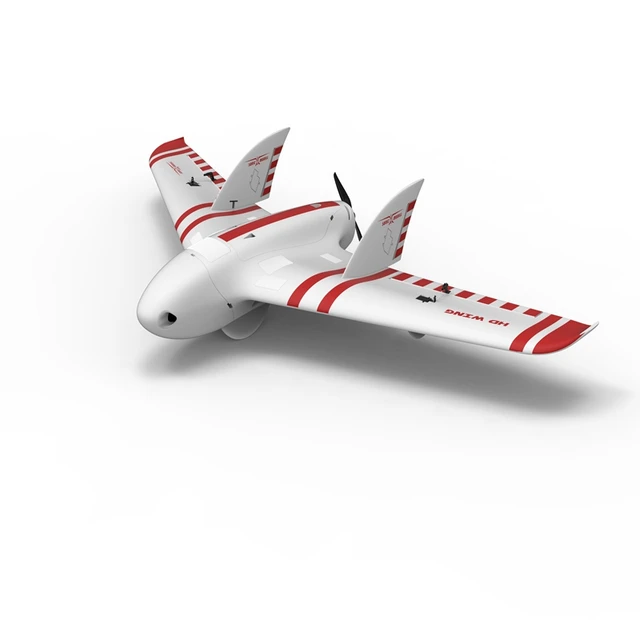
"This 1213mm wingspan HD flying wing is designed for stable flight and multitask FPV flying, the specially designed high-efficiency airfoil and envelope offers great elevating force during flying, it’s spacious rooms inside fuselage are perfect for more FPV gear and large battery to ensure long flying time, we offer foam nose and plastic dome(interchangeable) for multiple FPV camera mount, the separate hatches in two wings are for Vtx and GPS mounting with great cooling effect, the landing sled in bottom of fuselage and wings will protect your airframe from scratches."


Let's look at the claims:


1213mm wingspan - Strange size, 1219 is 4 feet.   Usually, metric planes are just 1200mm.  Oh well, bigger is better.

Designed for stable flight-  Surprisingly stable,  the extra nose weight gives this plane flying authority.  It holds a position very well, the only tweaking needed was to get the trim right so as to not pitch nearly as much. 


Great elevating force during flying-  There were a few times during 'line of sight' flight I had to bring the plane back down closer to earth, because, yes,  it does like to climb. The worst part is that it's so smooth that you hardly notice it climbing.

 Large fuselage "
perfect for more FPV gear and large battery to ensure long flying time"- Perhaps one of it's greatest selling points, this is a nice platform for medium range FPV.   The plane is designed to haul around some weight.  I am checking it out now with different batteries.  But yes, it's ideal for adding cameras, perhaps many cameras.

"
 {F}oam nose and plastic dome(interchangeable)"- The plane comes with two foam noses and one clear plastic dome.  And yet, there aren't enough magnets for all of it.   Thus, if you order the plane you should order s"ome extra rare earth magnets.   You need magnets because many kits come with poor magnets or none at all.    Even kits like the HD Wing  feature magnets that you can loose over time, so having extras on hand is ncesssary.   

The separate hatches in two wings are for VTX and GPS mounting with "great cooling effect",-  This is important if you're running those really hot VTXs.  You can mount it out on the wing to help prevent it from overheating.   If you're flying with a flight controller you can further mount a XM+ are similar full range receiver on the wing  They are small, weigh next to nothing, help improve range while freeing up space in  the fuselage  Its strange that such a large fuselage would be nearly empty.  We are benefiting from our friends who fly micro quads.  The gear these days has been miniaturized.


The build

Thankfully there is a good build manual that comes with the plane, and plenty of good build videos, like those from Andrew Newton and 7Demo7.  You can piece it together on a dry build and get the gist of how to finish assembling it.   it's not a complicated build.   The one thing I wished I knew before I built it was that it can take some fairly large propellers. Other than the cheap 600mm "Spirit Wing" this is the only plane I've built that has the propeller sit fully behind the wing.  This means that there is no size limit to whatever propeller you want to use.   I like larger propellers.  They tend to be quiet and efficient and can be good for slow flying  The limiting factor will be weight. A little more weight in back means that it needs a lot more weight up front.  But still, this is fantastic for long range FPV with the right motor combination. 


The suggested motor is a 2212 2200KV.    With this motor, the pull of 700g it seems like it may struggle if you weight it down with heavy FPV gear or extra batteries. The smaller propeller is better suited for fast flight.  On my initial build, I used a 2830 1300KV motor swinging a 9x7 propeller. Performance wasn't lacking and speed was decent.   Best of all, it was quiet and helped the plane sustain a half an hour flight on a 3S 4000mAh battery


The build process is a bit longer than most, because it has a lot pretty cool options.  I must say that I fell in love with the plane during the build process. I love how the plane goes together, the attention to detail and the quality of the parts made me excited to get it in the air.

I did paint the plane. The one thing I can't get excited about is white EPO foam.  It has a certain unfinished look about it that I don't care for.   It's a bit stark and dull and can get hopelessly dirty after a few too many wet grass landings. If you have mroe than a few planes they all start to look the same when stored together.    With that being said I I will say that the decal set that came with this plane look decent.  I have no idea how long they will stay on once applied.  At least they don't look like they were designed with 14-year-old teenage boys in mind.


I use Krylon Foam Primer first.  Only a couple of coats are required  Let it dry and then start putting on the final colors.  I went for a two-tone paint job.  Black fuselage with yellow wings.  I like strong contrast in my planes because I find that they are easier to spot in the sky.  Since the body comes in two pieces I used a red bottom with a black top on the fuselage.  Visually, it was easy to see.  I wasn't the largest fan of the yellow in retrospect.  It had more of mustard yellow for my tastes.   I decided to call it "Honey Badger" because, in the end, the plane just don't give S*&T.   It's gonna fly and fly.   I even got it a honey badger decal.


The plane was finished off with a very durable 5mm lamination.  It helps keep the plane clean, prevents the paint from peeling  off, provides extra rigidity, and I've found helps lower drag. The bad news is that the plane looks like it's being stored inside a sandwich bag!  I've gotten used to the look of lamination on my planes.  I will say that I had to wrestle with the lamination on this build for a couple of evenings before it was done.


Areas of concern

Center of Gravity- People seem to struggle with finding the right CG for this plane.  It's going to take a couple of flights to really nail it down. There are a couple of dots on the bottom of the wing which many find to be the correct CG, and not the CG marks that come with the plane.


Exposed nose-  The other huge issue with the plane is that there is a huge nose that sits well in front of the delta wing.  During a crash, this will take the brunt of the damage.  True there are interchangeable noses, but there is also a wood plank that protrudes out with the nose.  If this breaks it's going to be fun trying to repair or replace it.  My best advice, don't crash!

Image result for sonicmodell hd wing


Plastic dome-  There is an FPV plastic dome options for the front.  The problem is that these clear domes give strange reflections that show up in thef light footage.  It gives the look of flying inside a plastic bubble.  This may be fine for an FPV camera, but for HD recording, stick the HD camera up on the top of the plane.

The maiden

After the first few attempts, the plane would fly for around five feet on full power and land on the grass. I gave it some serious thought and felt that perhaps the motor wasn't strong enough to make it fly.  I decided to try replacing the propeller with a larger one, when I noticed that for whatever reason the prop was on backward.  Once it was on the right way, it was one happy camper.  The next issue was that it didn't have enough weight on the nose. I got to test the foam nose in a real-world crash situation. after it went up and came right back down. Everything was fine.  Then I added considerably more weight to the nose and off she went!

My first flight was really an interim test flight.  This plane is going to be set up for FPV, but first I need to know how she flies.  So, I put in a very lackluster speed controller that I literally had laying around.  It doesn't like full throttle.  So, I had to test it with at most 70% throttle, which was fine.  But, I still didn't get to see the entire story.  And that is the issue for now.  After one successful maiden flight, I felt she was ready for an FPV upgrade.  So, she's been sitting around for weeks waiting for the upgrade.  Currently, I have other planes that are seeing their FPV upgrades first. The HD Wing will get better quality gear and when she's full FPV I will add on to this article.

But, how does she fly?

Image result for c1 chaser
C1 Chaser, notice how close the winglets are to the center of the plane


I can compare this plane to a C1 Chaser, which is essentially an oversized Wing-Wing.  The C1 is a plane that can fly slow and likes to glide.  And yet it tends to do a bit more wandering in the sky.  It may be because of the arc of the wing that makes it a bit more forgiving. and perhaps more ideal for newer pilots.  Thus if I were to suggest at 1200mm ideal for newer pilots it would be the C1 Chaser.  The HD Wing has a flatter wing, and thus likes a bit more speed and can be a bit less forgiving.  The HD Wing is all business.  It may be because I had the heavy 4 amp 3S battery up front but it was straight as an arrow.  So straight that it may be considered a tad bit boring.  It doesn't participate in the winds and changing air flow as much as the C1 Chaser seems to do.  It just holds its position very well.  Then again, that may be the huge amount of mass up front that I flew with doing the talking.  Regardless, this would be an excellent platform for FPV.   The plane literally demands FPV.  Without FPV, it may be just an 'Okay" line of sight plane.  I do like the C1 Chaser better as a line-of-sight plane.


Great elevating force?

The sales literature mentioned "Great Elevating Force."  Again this has to do with its wing design.   But yes, it catches lift in a bit of an unusual way.  It's subtle, over time it seems to go higher and higher.   So, when flying her, be certain keep an eye on her altitude.  She does like to climb.

Why I really like this plane

First, this plane is a rock solid platform.  You put it in the air and it flies straight and true.  It doesn't  roll from side to side nor gain or lose altitude.  It just flies straight.   This is just a very predictable flyer.   You can look down for a moment and the plane won't be on the ground.  This may be a good plane for a video platform because it flies so straight.   I do really enjoy her even though I haven't put a camera on her yet.


Image result for sonicmodell hd wing
Andrew Newton wins the award for best paint job.


FPV Potential


ZOHD is a division of Sonicmodell.   Not all their planes are winners, but more often than not they have exceptional planes.   I like what they are doing with the hobby.  Their planes are innovative.  The HD Wing is really setup to be an FPV plane. The nose has a few different options.  One is all foam and thus no FPV camera mounted onto the wood. There is an FPV camera cutout for foam option and  the third option is the clear dome.   You can also mount  a camera on the top of the plane.   Of all these options, I think the clear dome is fine for an FPV camera, but not a Runcam. 

There are spots off to the side of the fuselage where you can mount your GPS, VTX and receiver.  I am switching over to XM+  and thus will mount them onto the wing  The other thing I love about the plane is that the winglets have no risk of getting hit by the prop.  My next build of this plane will have an 11" prop. I am hoping for longer flight times and quieter flights.


Long Range FPV?

Image result for sky hunter
The full-sized SkyHunter is a better long-range FPV plane.

Long-Range FPV is a term that gets thrown around very loosely.  The people who do it well have worked their way up the technology food-chain.  Long-range FPV is a discipline and a huge commitment of time, effort, resources and money.  What most folks are probably thinking of is mid-range FPV.  The technology to fly a plane 3-5 kilometers away and bring it back is readily available and fairly inexpensive.   With each time that you fly a plane beyond line-of-sight there is a realistic possibility that it won't come back.   Thus, you don't really want a huge financial investment flying away from you.  The HD Wing is a good idea for mid-range FPV because the plane is inexpensive.  It can also carry a lot of weight.  My little test with a 4amp 3S batery had the plane flying around for over half an hour.  I can easily see this plane flying for an hour, covering 20 to 30 kim in that period of time.

If you're going to test out FPV beyond line-of-sight, the further away you go the more you really need to be away from where people live and work.  We have a number of people doing stupid things with the technology we are given and sooner or later if this keeps up we'll all suffer from newer, more stringent laws and regulations. Some people aren't fortunate enough to live where there is a lot of open land.  If you do,  mid-range may be fun to try out.


Overall


Image result for thumbs up
The HD Wing gets a huge thumbs-up!

The HD Wing isn't a first or second build  plane.   Perhaps it's not even a park flyer.  There are some wonderful EPP foam wings you can cut your teeth on before taking on this plane.    I have a lot of gripes about the Wing Wing style of plane.  The winglets near the prop make them louder than they should be. The motor mounts are often horrific.  And yet they fly so very nicely.   I have LOVED my C1-Chaser. The HD Wing is a more fragile step up from the C1 Chaser.  it's just better thought out.  The attention to detail is superb.   It demands a flight controller running INAV.  My next build of this plane will have digital servos and it will fly like silk.  About my only gripe is that the plane comes with extra noses, but why no option for an extra battery tray?  You know that people have been breaking it along the way.  I can make something work with hobby wood, but why not at least sell its replacement on eBay?

Overall, this is a nice plane to own. It's not a "must have" plane.  IF you do buy it, you'll appreciate it.  It's a wonderful plane!  1200mm or something around there is a nice sized plane to fly.  It does fly differently than an AR Wing.  This plane is very nice, and is certainly a keeper.   Build it right, treat it well and you'll love it for a long time.  This is probably one of the most under-rated planes in the market.  There's a lot to love about it.


I will update this article once I have the FPV gear added to the plane.

The fun of buying used planes

  If you like to buy and sell used planes.  Occasionally you can find really good deals. I mean, mind blowing deals.  Most of the time you d...