I will go over the pieces of what I feel does and doesn't work. I'll explain each component.
The ESC
Very often, this is what you get.
Notice there are no connectors on either end? Here's what it's supposed to look like when it's done.

Other than the red Deans connector this is a typical setup for smaller planes. The bullet connectors plug into the motor. If the motor spins the wrong way, just swap two of the bullet connectors around and the problem is fixed.
So, let's set it up.
Connectors
Battery:
I buy these out of China via eBay, they usually sell for around $1 each set. It's 12 gauge wire. You can buy the connectors and solder them on directly to the wire from your ESC. The problem with that is that the leads melt the plastic and they can start going in the wrong direction. I find that wire with leads I buy from China tend to be perfect. Large, lovely 12 gauge silicone covered wire with the polarity right.
Bullet connectors
The most common size I've found is 2/5mm. If you're flying any motor with a 22mm, 28mm, 35mm diameter motor these are what are most common. I buy these in sets of 50

Yes, you could solder the connection, but unless you're using a flight controller where you can easily reverse the direction of your motor you'll want to stick to a solution where you can remove the motor from the speed controller easily. You may want to swap motor directions or audition a new motor. You will need to solder these onto the wires. It's not that difficult. A cheap $10 soldering iron will do the trick.
Connecting all ends
So, now that we have the parts to connect the ESC to the battery to the motor you'll need some parts.
Soldering the connectors.
There are a few parts you'll need. This video explains what they are and how to solder the connectors.
Here's my source list for all the soldering stuff you should get. I don't get any money from these suggestions. And you're free to get what you want.
Soldering Iron Solder Solder Stand Wire Stripper (Good ones) Bullet connector/XT60 solder stand Heat Shrink
This is a list that will get you started. You may want to add from here as you get more into the hobby.
All these supplies should be around $50 US if not less. When you get going you can get a good set of helping hands and a good heatgun. My Porter Cable heat gun was just a few dollars more than the cheap Chinese ones. It's worth the money.
Connecting wires
What doesn't work
Insulated crimps are horrible. If you use them you're not supposed to use heat shrink. If you do the heat from the heatgun will losen the crimps. On an RC plane, you want the most secure connection possible because the wires get pulled on often as batteries fall out of your plane on landings. I found a 'do it once and forget about it' solution.
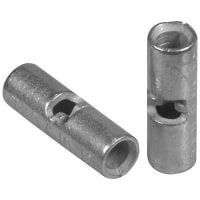
Non-insulated crimps

Here's the good news, they are freaking expensive. They range in price from 7 to 25 cents each. And if you don't cover them they will make contact with each other. So you'll need some heat shrink that covers them. While you're ordering these you'll want the very much more expensive 12AWG to 16AWG step down non-insulated butt connectors. The reason why is because the wire for the speed controller is often thinner than the wire from the XT60 connector. It's expensive but worth it.
Crimp tool

The Klein Tool J1005 is around $33. It's expensive I know. But, it's solid. When you use the step down butt connector crimps you're going to squeeze very hard (or step on it with your foot) This tool works like gold. The crimps are perfect. Cheaper crimp tools just tend to crush the connector.
A word about speed controllers
If you're flying a foam plane and not too worried about weight and space, these speed controllers work great! When you get into lighter weight planes where weight and space are a factor you'll want to move into one of these types of speed controllers

These things are around 2/3rds smaller and lighter. They are designed for drones. They are missing the BEC (Battery Eliminator Circuit) and thus if you want to use one, you'll have to add it.
So, this is my setup with a BEC and the bullet connectors attaching the XT60 wires that are 12AWG to this 18awg set of wires that I soldered together.

The little servo connector that comes off those smaller speed controllers made for drones still plugs into your motor port on your receiver. But, you'll need to to plug the little servo connector as shown above in an available port to give your receiver 5 volts. Otherwise, you're not going anywhere!
Summing it all up
I know this looks like and sounds like a lot of work. To wire up a plane's motor with bullet connectors and then do the rest of the speed controller build is less than 30 minutes.I am a stickler for technique because I didn't use to be. What I found was that sometimes the connection worked, and sometimes they didn't. Now, if I do it right, I usually never have to worry about it, ever again.
I am not as bold as to say "This is the right way" or "This is the best way." This is a way that works for me.


No comments:
Post a Comment